How to Crop a Video on Windows 10 & 11 PC for Beginners

Capturing the perfect video for Instagram Reels can be a challenge, especially when the aspect ratio or an unwanted element in the frame prevents your masterpiece from shining.
Thankfully, with some simple video cropping skills, you can overcome these obstacles and create flawless content.
In this beginner's guide, we'll teach you how to crop videos on Windows 10 & 11 and Mac using an easy-to-use video cropper tool while also providing valuable tips and insights.
- How to Crop a Video on PC
- Tips on How to Crop a Video
- Download the Best Video Cropper for Free
- How to Crop a Video FAQ
How to Crop a Video on PC
How to Crop a Video on Windows 10 & 11 PC for Beginners
Using PowerDirector on Windows 10 & 11 is simple. Follow these steps to crop your video:
- Download and install PowerDirector.

- Open the software and select Crop & Rotate.

- Import your video.

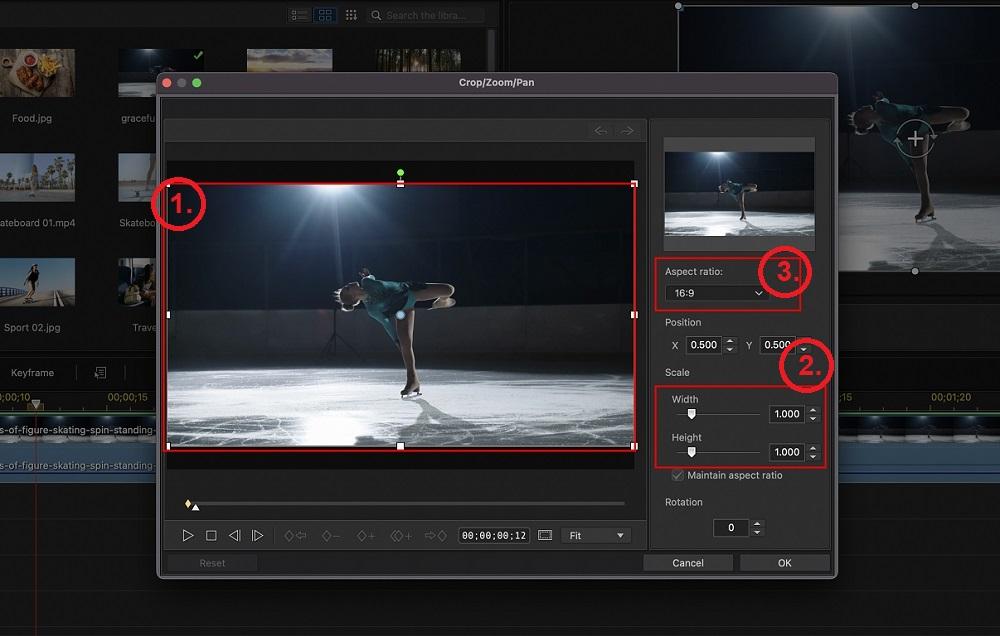
- Crop your video using the available options and click OK.

There are 3 different ways to crop video with PowerDirector.
Option 1: Place the cursor on a corner of the video and move the cropping box in or out, then click in the middle to move the box to the desired location on the screen.
Option 2: Use the slider or up and down buttons next to Height and Width to change the size of the cropping box. Then use the up and down buttons next to X and Y to change the location of the cropping box.
Option 3: Choose a pre-determined Aspect Ratio from the drop-down list.
How to Crop a Video on Mac
Mac users can also crop videos using the PowerDirector video cropper. Download PowerDirector for Mac below and follow these steps to learn how to crop a video:
- Download and install PowerDirector.
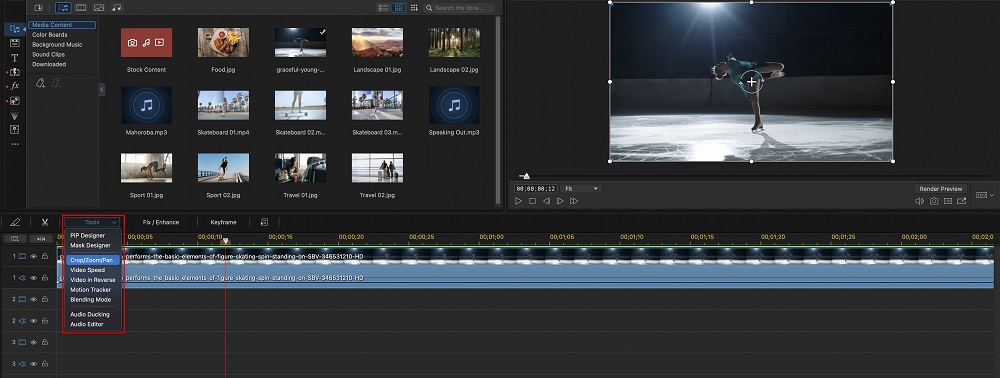
- Import your video and add it to the editing timeline.

- Open Edit, then Crop/Zoom/Pan under Tools.

- Crop your video using the available options and click OK.
Tips on How to Crop a Video
Tip 1: Remember composition rules.
When cropping your videos, remember the basic rules of composition, such as the Rule of Thirds, headspace, and negative space. Ensure that the subject is positioned appropriately within the frame and avoid awkward cuts or unbalanced visuals. Here are some composition tips to consider when cropping:
- Rule of Thirds: Imagine your video frame divided into a 3x3 grid. Place your subject or important elements along the gridlines or at their intersections to create a more dynamic and visually appealing composition.
- Headspace: Leave some space above your subject's head to avoid making the shot feel cramped or uncomfortable.
- Negative Space: Use the empty or unoccupied areas of the frame to emphasize your subject, create balance, and guide the viewer's eye.
Tip 2: Avoid cropping too much.
Excessive cropping can lead to a loss of video quality and result in a grainy or pixelated appearance. To maintain optimal video quality, try to capture your subject as close to the desired framing as possible during the initial recording. If you need to crop a video, be mindful of the potential impact on quality and avoid making the cropped area too small.
Tip 3: Know your target aspect ratio and orientation before cropping.
Different platforms and devices have varying aspect ratios and orientation requirements. Before cropping your video, research the specifications for your intended platform to ensure a seamless viewing experience. Here are some common aspect ratios and orientations for popular social media platforms:
- Instagram Feed: 1:1 (square) or 4:5 (vertical)
- Instagram Stories and Reels: 9:16 (vertical)
- Facebook Feed: 1:1 (square) or 16:9 (landscape)
- YouTube: 16:9 (landscape)
- Twitter: 16:9 (landscape)
By understanding your target aspect ratio and orientation, you can crop your video accordingly and avoid unexpected results or unnecessary re-cropping.
Download the Best Video Cropper for Free
PowerDirector offers a quick, easy, and versatile video cropping solution. Its user-friendly interface and editing tools make it perfect for cutting, refining, adding effects, and publishing videos.
Download PowerDirector for Windows or Mac today, and never worry about the perfect video size again.
How to Crop a Video FAQ
- Crop:
The cropping function in video editing software allows you to modify the visual composition of a video by removing unwanted elements or focusing on a specific subject within the frame. This process can improve the overall aesthetic of the video and create a stronger visual impact.
Adjusting the aspect ratio can help tailor the video to specific platforms, as different platforms may have different requirements for aspect ratios (e.g., square for Instagram, landscape for YouTube). This can help ensure that your video looks its best and is optimized for viewership on a particular platform.
- Trim:
Trimming a video involves removing parts from the beginning or end of the clip to reduce its overall length. This editing technique can help you eliminate unnecessary or irrelevant footage, tighten the narrative, and make the video more engaging. By focusing on the most important and relevant parts of the video, you can create a more concise and impactful viewing experience for your audience.
Trimming can also help your video meet time constraints, such as the maximum duration allowed on certain platforms or fitting within a predetermined program schedule.
- Split:
The split function in video editing software enables you to divide a single video clip into multiple segments. This can be particularly useful when you need to remove certain parts from the middle of a video or to insert other clips in between existing footage. By splitting the video into separate segments, you can rearrange, delete, or add new content as needed to create a more polished and cohesive final product.
Splitting a video can also help you emphasize specific moments or create smoother transitions between different scenes or shots. This technique can be valuable for storytelling, pacing, and maintaining viewer interest throughout the video.
To Rotate a video means to change from portrait (vertical) to landscape (horizontal) or vice versa.
Open PowerDirector on your desktop and follow these steps:
- Add the video you would like to rotate to the editing timeline.
- Open Edit, then Crop/Zoom/Pan under Tools.
- Use the arrow keys under Rotation to gradually rotate your video, or type in 90 to switch the orientation by 90 degrees.
- Click OK when done.
For more information, check out How to Rotate a Video on Windows and Mac for Free.
Cut a video to the desired length by using PowerDirector's video trimmer. Open PowerDirector on your desktop and follow the steps below:
- Add the video you would like to trim to the editing timeline.
- Click on the Trim icon (looks like scissors) in the menu above the timeline.
- Put your cursor on the front of the trim slider to trim the beginning of the video or the back of the slider to trim the end. You can move the slider to the left or right to trim when your cursor becomes a double arrow.
- Click OK when you are done.
For more information, check out How to Trim a Video for Free.
You can easily crop a photo using PhotoDirector. Download PhotoDirector on your desktop and follow along:
- Click Import and find the photo you want to crop, then click Open.
- Click Edit along the top menu, then click the Crop/Straighten icon along the right-hand menu.
- Place your cursor on the corners until it becomes a two-sided arrow, then move in and out to adjust.
For more information, check out How to Crop an Image for Free.
- Variety of ways to crop video
- A good image cropping software will have more than one option to crop videos, such as a cropping box over the image you can move manually, input buttons for an exact length and width, or a drop-down menu of different aspect ratios to choose from. Automatic crops for popular aspect ratios
- It can be hard to remember all the different aspect ratios used by popular social media sites. Therefore, it is beneficial when your image cropping software has aspect ratios labeled for you (Instagram Reel, YouTube, Facebook Video, etc.).Undo/Redo buttons
Once you have the crop box in place, the rest of the image magically disappears. It is good to have the option to bring back the eliminated part of your image and try again in case you don't like the result or accidentally cut out something that you shouldn't have.
If you’re looking for a video cropper that checks all of these boxes, we recommend PowerDirector.
The best video cropper apps for mobile are:
- PowerDirector
- Apple Photos
- Google Photos
- iMovie
- AndroVid
For more information about how to crop a video on a mobile device, check out 5 Best Free Apps to Crop Videos in 2025.
Follow these steps to crop a video:
- Download and install PowerDirector.
- Import your video and add it to the editing timeline.
- Open Edit, then Crop/Zoom/Pan under Tools.
- Crop your video using the available options and click OK.
Yes, you can change the size of a video using video editing software or online tools. Changing the size of a video typically involves altering its resolution, which is the number of pixels displayed horizontally and vertically. This process is often referred to as resizing, scaling, or resampling.
There are two main ways to change the size of a video:
- Downscaling: This involves reducing the resolution of a video, which can lead to a smaller file size and make the video more suitable for playback on devices with lower screen resolutions or limited bandwidth. Downscaling a video can also help you meet the resolution requirements of specific platforms. However, reducing the resolution may result in losing detail and overall video quality.
- Upscaling: This is the process of increasing the resolution of a video. Upscaling can help improve the appearance of a low-resolution video when viewed on a high-resolution display or when meeting the resolution requirements of a particular platform. However, it's important to note that upscaling does not add more detail to the original video; it merely interpolates the existing pixel data to create a larger image. As a result, upscaling can sometimes lead to decreased perceived video quality, with the output appearing blurry or pixelated.
To change the size of a video, you can use video editing software such as PowerDirector.
When resizing a video, always consider the aspect ratio, which is the relationship between the width and height of the video. Maintaining the original aspect ratio during resizing ensures that the video does not appear stretched or distorted.


