How to Rotate a Video on Windows and Mac for Free


Do you ever want to rotate your video after you’ve shot it? Like when you realize your camera wasn’t quite as level as you thought while you were recording or you had your camera in the wrong orientation, and now you need to turn the image 90-degrees before you share it.
Maybe you just have a creative idea, and you want your shot at an extreme angle, upside down, or even rotating in motion as the clip plays out.
Whatever your reason for rotating your video, this article will show you how to adjust your video's angle to get the shot you want. All you have to do is follow the simple step-by-step instructions for your software of choice, and your videos will be turned in the direction you want.
- How to Rotate Videos on Windows and Mac
- The Easiest Way to Rotate Videos on Windows and Mac
- How to Rotate a Video in Windows Media Player
- How to Rotate a Video in iMovie
- Best Video Rotation Software Free Download
- Rotating Videos FAQs
How to Rotate Videos on Windows and Mac
If you want to rotate a video on a computer you can utilize native apps available on both Windows and Mac. These apps, however, are highly limited in their capabilities and only rotate videos in 90-degree increments.
This is fine if you simply want to change a video from portrait to landscape or flip it upside down. But if you want to fix a crooked shot or create a more appealing angle, you will need more advanced software.
If you’re looking for an easy-to-use tool that gives you the most control to rotate your videos, try PowerDirector. It is available on both Mac and Windows and is free to download.

The Easiest Way to Rotate Videos on Windows and Mac
Let's take a look at how easy it is to rotate videos with PowerDirector. The process is the same on both Windows and Mac.
Once you have downloaded and installed the program, follow these simple steps.
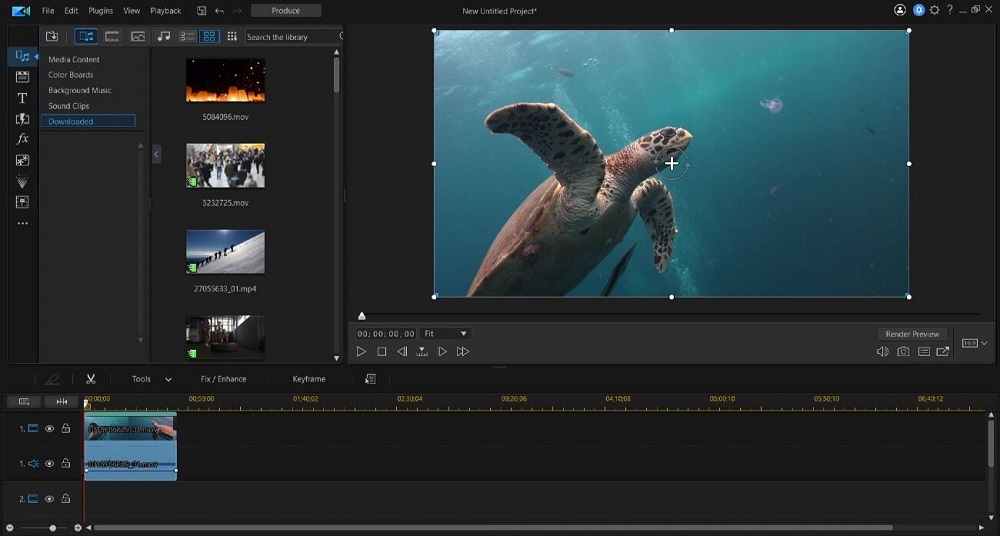
Step 1: Simply drag and drop your video into the software and then onto the timeline.

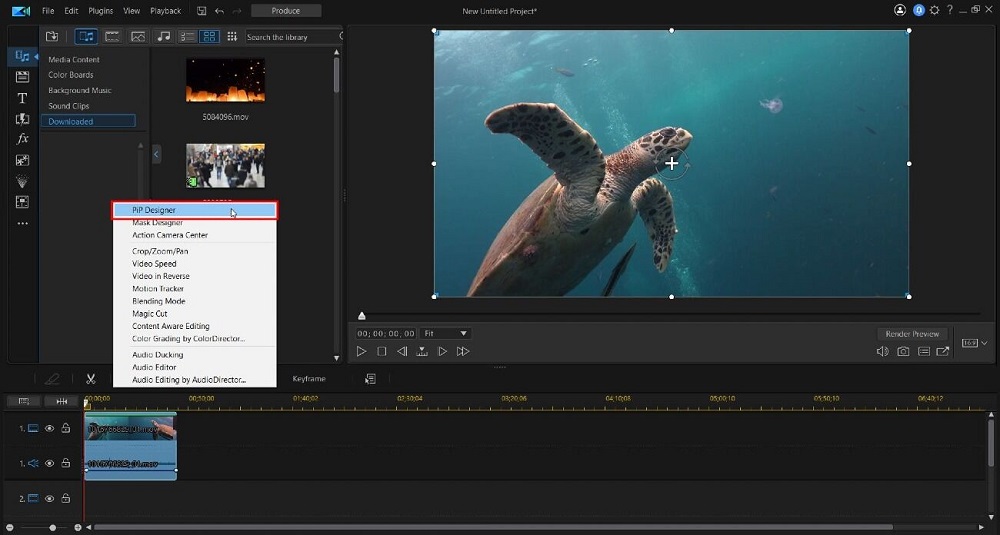
Step 2: With the video selected open Tools, then PiP Designer in the dropdown menu.

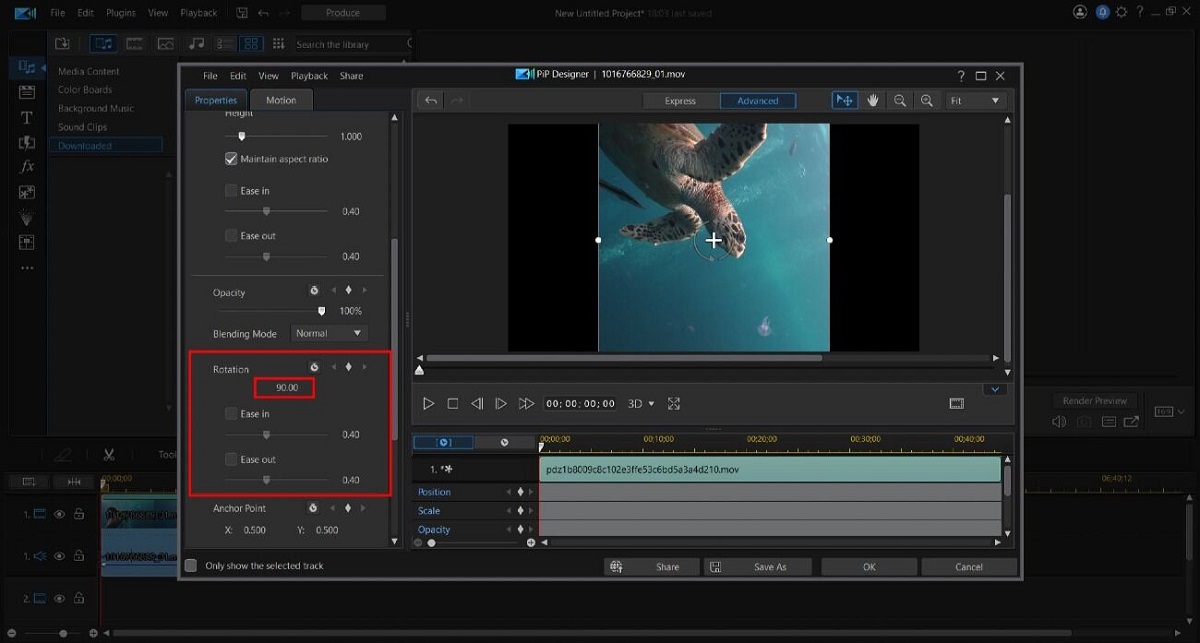
Step 3: In the Pip Designer window, open Object Settings and scroll down to Rotation.
If you don’t see Rotation make sure Advanced is highlighted, not Express at the top of PiP Designer.
Step 4: Type in the rotation degree, or rotate the image manually by using the circular arrows in the middle of the frame. Add keyframes throughout the shot if you want to create a rotation animation.

Tip: While PiP Designer allows for more control, you don’t need to open it to rotate your video. You can simply use the circular arrows in the Preview Window.
How to Rotate a Video in Windows Media Player
Unfortunately, there is no way to rotate videos in Windows Media Player. However, you can use a native Windows app like Photos which contains a basic video editor.
Follow these simple steps to rotate a video in the Windows Photos app:
Step 1: Open the Photos app via the Windows Start menu.
Step 2: Along the top you should see Video Editor. If not, click on the small downward arrow next to the More tab. Select Video Editor.
Step 3: Create a New Video Project and give it a name.
Step 4: Click on + Add under Project Library to upload a video. Or you can drag and drop a video into the Project Library box.
Step 5: Select your uploaded video and then click Place in Storyboard.
Step 6: In the toolbar menu at the button click on the rotate icon on the right. Click it until you have the desired rotation.
Step 7: After rotating, click Finish Video in the top right.
Step 8: Select the Video quality you would like and click Export.
How to Rotate a Video in iMovie
iMovie on Mac is a great native option to make basic edits to your videos. If for some reason you can’t find the software on your computer you can always download it from the app store.
Step 1: Import your video into the media library.
Step 2: Drag the clip into your timeline.
Step 3: Select the desired clip in the timeline. In the viewer window, just about the image, select the cropping icon.
Step 4: From the dropdown tools, on the right side, select from the two rotation tools. You can rotate in 90-degree increments clockwise or counterclockwise until the video is in the desired orientation.
Step 5: To reset rotation (and cropping) adjustments, click the reset button to the right.
Best Video Rotation Software Free Download
Though there are native apps available to rotate videos, they are highly limited in functionality and therefore might not be the best choice. Neither the Apple video editor iMovie nor Windows video editor in Photos provides rotation beyond or less than 90-degree increments. They also require more steps than PowerDirector which gives you full control over the degree to which you rotate.
If you need to rotate your videos, try PowerDirector for free. Not only will you be able to rotate your videos, but you’ll have access to a full range of editing features and effects. Including AI tools like sky replacement, object detection, wind removal, and speech enhancement.
Start producing better videos today!

Rotating Videos FAQ
Download the PowerDirector app on Android or iPhone for free and follow along.
Step 1: Select the Media icon and locate the video you want to rotate.
Step 2: Select the video and tap the + sign to add it to the app.
Step 3: Tap the Edit icon (the pencil).
Step 4: Tap Rotate.
Each time you tap Rotate, the video will rotate 90 degrees.
Also, you can rotate a video with the circular arrow located in the corner of the video. Simply rotate the video to the angle you want with your finger.
To mirror a video on Windows and Mac follow these steps using PowerDirector.
Step 1: Drag and drop your video to the PowerDirector Timeline.
Step 2: Select the FX icon to open the Effect Room in the left-hand toolbar.
Step 3: Scroll down to the Mirror effect.
Step 4: Drag and drop the Mirror effect onto your clip.
Step 5: To change the Mirror Effect Settings you’ll need to open the Effect Menu by selecting your video in the timeline and clicking on the Effects tab.
Here’s how to crop a video using PowerDirector on Windows and Mac:
Step 1: Drag and drop a video in your Timeline.
Step 2: Select the video and open Tools, then select Crop/Pan/Zoom.
Step 3: Crop as needed using the crop box in the preview panel.
Or simply crop the video by filling in the precise numbers for Width and Height.
Here’s how to crop a video using the PowerDirector app on iOS and Android:
Step 1: Create New Project.
Step 2: Find the video you want to crop.
Step 3: Add it to the timeline by tapping the + on the video.
Step 4: Select your video in the timeline to bring up the Edit icon and open Crop.
Step 5: Move the box with your fingers to crop the video.
Flipping a video on Windows and Mac with PowerDirector:
Step 1: Go to the Menu bar and choose the File menu. Select Import then Media Files…
Step 2: Drag your video from Media Content to the Timeline.
Step 3: Click on the video to bring up the toolbars right above the timeline.
Step 4: Click on Tools.
Step 5: Click on PiP Designer.
Step 6: Scroll down to Flip and select it.
If you don’t see Flip, make sure Advanced is highlighted instead of Express over your video in the preview window.
Step 7: Select either Upside Down or Left to Right, depending on how you want to flip your video.
Step 8: Click OK, then Produce your video or continue editing.
Step 1: Drag and drop your video into the editing timeline
Step 2: Click on the Trim button; the Scissors icon on the left, just above your timeline.
This will open your trim window.
Step 3: Choose between Single Trim and Multi Trim.
Using Single Trim, drag the play head to the point you want the video to start at.
Select the Mark In button.
Step 4: Then drag the play head to the point you want the video to stop.
Select the Mark Out button. Click OK to save the changes to your timeline.
The Multi Trim feature works in the same way as Single Trim. Though with this tool you can remove multiple segments from your clip. This is helpful for cutaways.
Step 1: Drag the play head to where you want the video to start and click Mark In.
Drag it to where you want it to stop and click Mark Out.
Step 2: After your starting and stopping points are all set, click OK to add the clips to your timeline.
Step 1: If you haven’t done so already, import the video clips you want to join together.
Step 2: Drag and drop the selected clips into your timeline.
Step 3: Arrange the clips in the order you want them merged by dragging them into position.
If you want to add transitions between two clips, open the Transitions Room from the top left toolbar and drag the desired effect to your timeline right between them.
Step 4: After arranging your video clips and adding transitions, save your project and export it.
Once you’ve selected your photo from your library, you can rotate a photo via the Crop and Straighten tool found in both Adjustment and Edit.
Adjustment Location: Under Regional Adjustment Tools in the Manual tab.
Edit Location: Right-side toolbar.
Step 1: Select the Crop and Straighten icon.
Step 2: Adjust the angle with one of these options;
Option 1: Enter the degree you desire in the value box to the right.
Option 2: Move the slider to rotate the image.
Option 3: Use the straighten tool to draw the axis that should be horizontal or vertical.
Option 4: Grab the corner of your photo and rotate manually. (Edit only)


![7 Best Software to Create a Lens Flare [Photo & Video]](https://dl-file.cyberlink.com/web/content/b1634/Thumbnail.jpg)

![The Best Free App to Turn Your Photo into Anime [2026]](https://dl-file.cyberlink.com/web/content/b1833/Thumbnail.jpg)