How to Live Stream on Facebook for Free [PC, XBox One, PS4, Switch & Mobile]

Data from Juniper Research indicates that the game streaming industry’s earnings could increase by over a billion dollars within the next four years. If you want a piece of this pie, now is the time to become a game streamer.
Twitch and Facebook remain top contenders in the live streaming space. Twitch draws around 30 million visitors each day, while Facebook Live attracted more than two billion viewers between 2016 and 2018. With its massive audience reach, Facebook offers a powerful opportunity to grow your brand and connect with viewers through live streaming.
Are you a gamer who wants to learn how to stream on Facebook? If so, read on to discover how to stream games on Facebook from your PC, Xbox One, PS4, Switch, and mobile devices. However, before we delve into how to stream live on Facebook, let’s look at the essentials you need to start streaming.
If you’re in need of streaming software make sure to check out the 5 Best Streaming Software for Twitch, YouTube, or Facebook.
- What You Need To Start Streaming on Facebook
- How To Live Stream on Facebook Using PC
- How To Live Stream on Facebook With Xbox One
- How To Live Stream on Facebook With PS4
- How To Live Stream on Facebook With Switch
- How To Live Stream on Facebook from Phone / Tablet
- Start Facebook Live Streaming [Free Download]
- Streaming on Facebook FAQs
What You Need To Start Streaming on Facebook
The four essential things you need to start a Facebook Live stream are:
1. Video and Audio Source
Your audio and video sources are the devices that record the content you intend on streaming. Video sources typically include cameras or computer monitors for live streaming your gameplay. Audio sources may include microphones and mixer feeds that generate the audio data heard by audiences during live streams.
The quality of your audio and video sources will affect your stream's audio and video quality. That’s why it’s best to invest in high-quality cameras and microphones for Facebook streaming.
2. Video Encoder
The typical camera records and saves videos as large files that are difficult or impossible to stream live. A video encoder collects such recordings and translates them into data that you can transmit via the internet in real-time. You can get an encoder as software or hardware.
Software Encoders
Using a software encoder requires installing the app on your computer. Besides the software, you will need a capture card to collect video data from your source and send it to your computer. The encoder installed on the computer will then translate the data and transmit it online.
Several free and paid software encoders are available, but PowerDirector with Screen Recorder 4 trumps the competition. That's because it’s easy to use and compatible with various PCs. You can download it for free below and we’ll show you how to use it’s tools to live stream on Facebook in no time.
Hardware Encoders
A hardware encoder is a specialized processor that captures and encodes video and audio data before live streaming it. Instead of buying a separate PC for streaming, you can buy a hardware encoder and use it alongside your current PC. Also, if you use a hardware encoder, you won’t need a capture card.
3. Streaming Destination
A streaming destination is where your audience can view your live stream. Several streaming service providers are available, but we will focus on Facebook Live. When you live stream on Facebook, Facebook users can watch your live stream via the platform’s website or app.
Compared to other streaming destinations or Content Delivery Networks (CDNs), Facebook Live is fast and free to use. Also, since Facebook has one of the largest online communities, you can quickly build a huge fan base by putting out quality content and promoting it.
Lastly, Facebook community guidelines for game streamers are not as restrictive as other streaming destinations. As long as you treat your viewers and other users respectfully, you should be fine.
4. Steady Internet Connection
To deliver a buffer-free live stream, you need an internet upload speed of at least 6 to 8 Mbps. Anything lower, and your audience may experience lags and other issues. If viewers can’t enjoy uninterrupted viewing during your Facebook live stream, they will likely stop watching.
Note that the higher the internet bandwidth, the higher the video quality settings you can use. Also, for the most reliable internet connection, use Ethernet instead of Wi-Fi. Cellular internet and Wi-Fi signals can fluctuate for various reasons beyond your control and compromise your live stream quality.
How To Live Stream on Facebook Using PC
Thanks to PowerDirector’s Screen Recorder 4, streaming on Facebook with your PC has never been easier. Here’s how to stream on Facebook with your PC and PowerDirector:
1. Download PowerDirector
PowerDirector is a powerful and easy-to-use video editing app that can serve as your software encoder. Download a free version of the software here and install it on your Windows computer. After installing the software, launch it on your system.
2. Open Screen Recorder 4
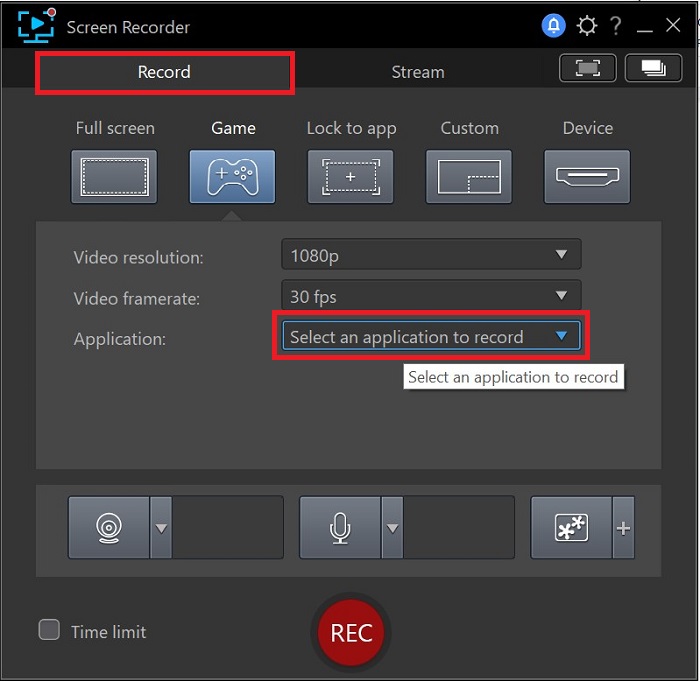
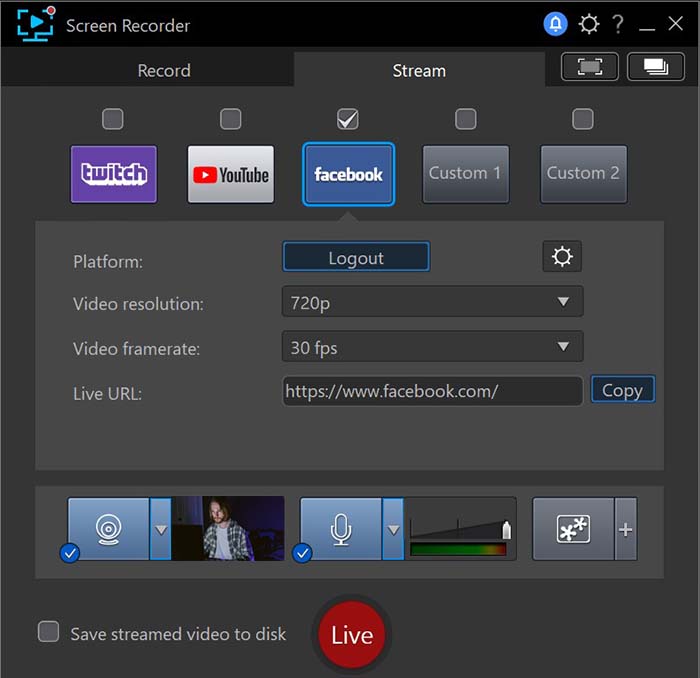
PowerDirector’s Screen Recorder 4 can record and stream video and audio from your PC screen. Launch Screen Recorder 4 and switch from Record to Stream to stream your gameplay on Facebook.
Under Stream, select Facebook and uncheck the other streaming options. Click Login to log into your Facebook account, or you won’t be able to live stream your gameplay via your account.

3. Setup Game for Streaming
Launch the game you want to stream and return to Screen Recorder 4 to click the Game icon. Go to Application, where you will find a list of games currently running on your system. Select the one you want to stream and choose your preferred streaming video resolution and frame rate.

A higher video resolution and frame rate will lead to a higher quality stream. However, you should only use a setting that your internet bandwidth can support. After selecting your settings, click on the Preview icon to see how your stream looks.
If the video is lagging, consider reducing the frame rate and resolution.
4. Add a Webcam
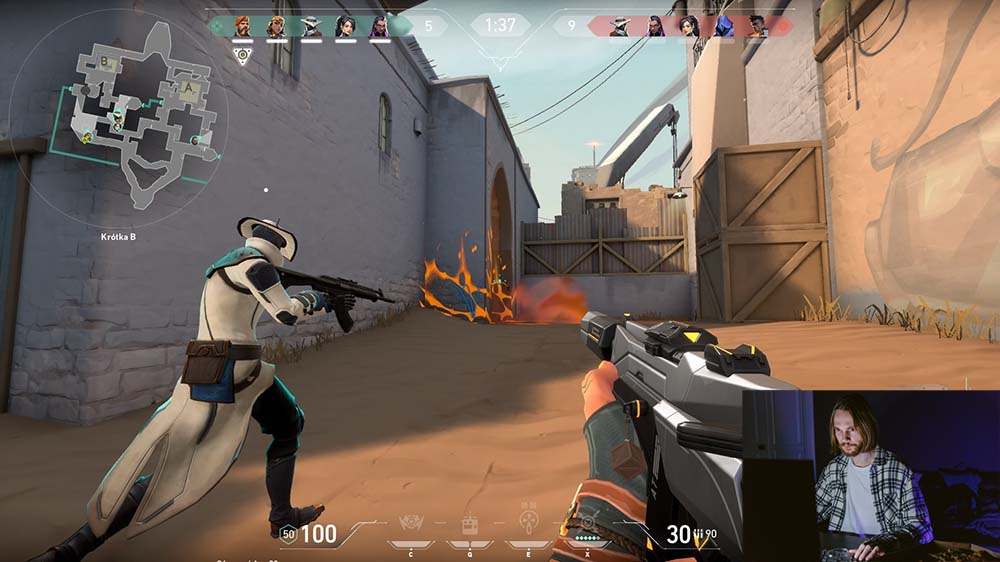
If you want your viewers to see your face alongside your live-streamed gameplay, click on the Webcam icon beside the Microphone icon. After clicking Webcam, you should see yourself on the preview page.

You can reduce or increase the size of the webcam display and place the live feed of yourself in any part of the video. It is common practice to place the webcam feed at the bottom left or right of the screen.
5. Add Overlays
Go to the webcam settings and click the Chroma button to add a background overlay to your webcam video. Use the Denoise slider to make the background of your webcam footage transparent. You can keep the transparent background or add a picture as an overlay image.
After completing your settings, click on OK.

6. Share Your Stream URL
Highlight the text in the Live URL tab and copy it. Share the URL and the schedule of your live event on Facebook and other social media. That way, your fans will know where to watch your next event.
7. Go Live
Preview your video one more time to verify that everything is working smoothly. If you are happy with your settings, click the red Live button to begin live streaming on Facebook. You can end your live stream by clicking the red Stop button.

How To Live Stream on Facebook With Xbox One
You can use your Xbox One’s built-in features to record gameplay and upload the footage to Facebook. However, since the Xbox One has limited streaming capabilities, you may not get the best possible streaming experience.
Fortunately, you can create a top-quality Facebook live stream with a screen recording software like PowerDirector’s Screen Recorder 4. Here’s how to record or Facebook live stream gameplay from your Xbox One with Screen Recorder 4:
- Install PowerDirector on your PC
- Connect a video capture device
- Open PowerDirector and click on the Plugins menu
- Open Screen Recorder and under Capture Settings, choose Device
- Select your preferred input device and video frame rate and resolution
- Tap the Webcam icon to add a video of yourself playing the game
- Click on the Microphone icon to adjust the audio recording settings
- Click the Record button to start capturing your gameplay and click Stop to end the recording
- Or to stream, switch from the Screen Recorder Record tab to the Stream tab
- Select Facebook, log into your account and click the red Live button to begin streaming
An alternative to live streaming is editing your saved footage with PowerDirector and uploading it to Facebook when you are ready. You can edit your footage by adding transitions, titles, effects, and more before sharing the video online.
How To Live Stream on Facebook With PS4
Like the Xbox One, the PS4 has limited live-streaming capabilities. You can circumvent the console’s streaming limitations with PowerDirector. Here’s how to stream on Facebook from PS4 with PowerDirector’s Screen Recorder 4:
- Install PowerDirector on your PC and launch the program
- Start your PS4 console and launch the game you want to stream
- Connect your PS4 console to your PC with a video capture device
- Open Screen Recorder 4 via PowerDirector’s Plugin menu, select Facebook and log in
- Switch from Record to Stream
- Under Capture Settings, choose Device and select your preferred input device
- Check your microphone settings
- Share your stream URL with your fans and click Live
You can preview your stream before going live. If you want to provide commentary during your gameplay, add a webcam before clicking Live. You can resize the webcam window and place it anywhere you want on the live stream.
You can also change the background of the webcam feed to improve the aesthetics or add your brand name.
How To Live Stream on Facebook With Switch
Streaming Nintendo Switch Lite gameplay to Facebook is impossible for now. However, if you own a regular Nintendo Switch, you are in luck. Before delving into how to stream on Facebook with a Switch, note that you will need a:
- Capture card
- Nintendo Switch dock
- PC with a monitor
- Stable internet connection
- TV or monitor for playing the game
- HDMI cable
Once you have the necessary hardware, follow these steps to put them all together:
- Place your Switch in the docking station
- Remove the joy-cons
- Plug an HDMI cable into the Switch Dock and plug another into the capture card input slot
- Plug the other end of the capture card HDMI cable into the screen for playing your Switch
- Plug the USB cable of your capture card to your PC to transfer audio and video from the Switch to your PC
- Add a webcam and microphone to your PC if you don’t like the system’s inbuilt audio and camera hardware
After setting up your hardware, install a broadcasting software or software encoder on your PC. We recommend installing PowerDirector with Screen Recorder 4.
After installing the software and launching your game, set up PowerDirector to live stream to Facebook, share your stream URL with your audience, and click Live.
How To Live Stream on Facebook from a Phone/Tablet
If you own an Android or iOS mobile device, here’s how to stream on Facebook:
- Download and install the Facebook app on your device
- Launch the app and sign in with your Facebook account
- Navigate to the Post section and click the Live icon
- Select who can see the live video (friends, public, or specific people)
- Give the video a description
- Choose your preferred camera (front or back) and add filters
- Press the blue Start Live Video button once you are ready to begin recording
- End the live video by tapping the Finish button
After the live stream, you can post the video on your timeline, where it will remain until you delete it. Alternatively, add the video to your story, and it will stay there for 24 hours.
Start Facebook Live Streaming [Free Download]
After reading our guide on how to stream on Facebook, you might already be imagining yourself as the next Pokimane or Ninja. And with top game streamers earning an average of $3,000 to $5,000 a month, it’s definitely a dream worth chasing.
But success in streaming takes more than gaming skills — you need the right tools to create content that stands out. That’s where PowerDirector comes in. It lets you stream directly from your favorite console to Facebook and other platforms with ease.
Even better, PowerDirector’s intuitive interface and robust video editing features make it simple to polish your footage before sharing it online. You can cut highlight reels, craft showcase videos for your fans, and enhance your content with millions of royalty-free images and songs — all within the same platform.
Download PowerDirector for free today and use Screen Recorder 4 to improve your game streaming experience. Alternatively, buy a paid subscription to access all of PowerDirector's creative assets and export features.
Streaming on Facebook FAQs
1. How do I save Facebook streams?
If you are streaming with PowerDirector’s Screen Recorder 4, saving your footage is as easy as clicking a button.
After setting up your stream with Screen Recorder 4, click the Save Stream Video to Disk box. You will find the box at the bottom beside the red Live button.
2. How do I schedule a live stream on Facebook?
On your PC, schedule a live stream on Facebook with these steps:
Step 1: Open your Facebook homepage
Step 2: Navigate to the top of your News Feed and Tap What's on your mind?
Step 3: Click … and tap Live Video
Step 4: Search the left column for Schedule Live Video Event and click it
Step 5: Select where you want your live video broadcasted (your timeline or on a page you manage)
Step 6: Name your event and choose the date and time for the broadcast
Step 7: Select your preferred privacy settings and tap Next
Step 8: Add a cover photo to your live video announcement and select Create Event
Scheduling a live video broadcast will automatically create an announcement post and a live video post. The announcement post will display on your profile, page, or group and contain details about the upcoming live broadcast. The live video post will automatically display on your profile, page, or group at the scheduled broadcast date and time.
3. How do I record and edit gameplay?
Record your gameplay with PowerDirector by opening Screen Recorder 4 and following these steps:
Step 1: Connect a video capture device to your computer
Step 2: Adjust the device capture settings
Step 3: Modify the microphone and webcam settings
Step 4: Add video overlays
Step 5: Click the red Record button
After saving your gameplay footage, you can edit it by:
Step 1: Dragging and dropping the footage into the PowerDirector timeline
Step 2: Trimming, cropping, and performing other video edits
Step 3: Adding titles, transitions, and special effects
Step 4: Exporting the edited footage to your system
4. What is the best video editor for cutting gameplay videos?
- PowerDirector
- Corel VideoStudio
- Pinnacle Studio
- Vegas Movie Studio
- Magix Movie Edit Pro
5. What features should I look for in streaming software?<
Below are the features that separate the top streaming software from the average ones:
- User-friendly interface
- Affordable price
- Video editing tools
- Royalty-free stock video, image and music library
- Multi-console compatibility
- Regular software updates
6. Should I pay for streaming software?
The most expensive streaming software isn’t always the best. Thanks to PowerDirector, you don’t have to pay for streaming software. The free version of the software allows you to stream videos affordable.


