How to Record Gameplay on Windows PC for Beginners

If you want to make it big in the online gaming community, whether as an eSports player or a streaming personality, you need to know what you’re doing. Recording your screen with an external camera and posting the unedited footage online won’t get you any followers, even if you play your game at a masterful level or provide side-splitting commentary.
However, becoming a skilled video producer will take time, especially if you try to figure it out on your own. You need to learn how to record gameplay on PC, what equipment to use, how to use it, and what tweaks will make people want to watch your videos.
This article will teach you how to record gameplay on PC, and everything else you need to know to put together professional-looking gameplay that is sure to attract followers. Once you’re comfortable with the basics, check out 5 Tips on Starting a Successful YouTube Gaming Channel in 2026.
- Decide on PC or Gaming Console
- Get the Right Gear
- Screen Recording and Editing Software
- Video Capture Card (If Recording Directly from a Gaming Console)
- Camera
- Webcam Software
- Headphones
- Microphone
- How to Record Gameplay on PC
- How to Record Gameplay on a Gaming Console
- How to Edit Gameplay With PowerDirector
- Tips for How to Record Gameplay on PC
- Download the Best Gameplay Recording Software for Beginners
- How to Record Gameplay on PC FAQ
Decide on PC or Gaming Console
The first step in learning how to record gameplay on PC, is to decide what game you want to record. While both PC games and console games can be recorded on your PC, the setup is different.
To record a PC game, you don’t need any extra hardware. All you need is screen recording software—which you can get for Windows 10 via PowerDirector with Screen Recorder 4. The software will record whatever you display on your monitor.
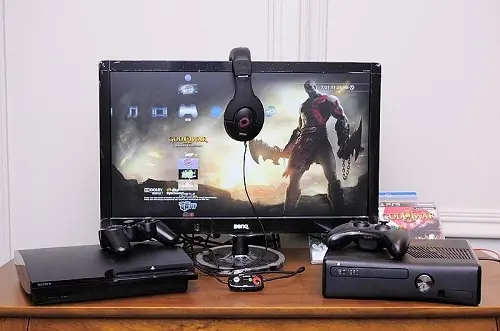
Recording on a PC from a gaming console, however, requires an external video capture card in addition to the screen recording software. The video capture card interposes itself in the video signal emitted from your console to your monitor or TV. Then, via USB cable, the device feeds the video to the computer, where the screen capture software records it.
Either way, the recording process won’t interfere with your gaming.
Get the Right Gear
Screen Recording and Editing Software
If you are learning how to record gameplay on PC, you’ll need to download screen recording software. Fortunately, the ever-capable PowerDirector comes with Screen Recorder 4, the best screen video capture for Windows 10. Screen Recorder will record whatever’s happening on your screen, no matter what type of screen you use.

Lastly, you’ll need a video editor to tie everything together and spruce it up. Because PowerDirector also comes with screen recording software, we highly recommend it as an all-in-one solution. Find out more about the best video editing software for gaming here.
PowerDirector will enable you to splice your video and audio clips together as well as add transitions, titles, background music, and any other special effects you desire—resulting in a truly professional-looking gaming video.
Video Capture Card (If Recording Directly from a Gaming Console)
Xbox Series X, Xbox One, PS4, and PS5 all have the ability to capture and broadcast streams. Even so, we recommend using a capture card to take the CPU load off of your PC and reduce lag or freezing. It’s an especially good thing to have if you live stream and need a crystal clear signal. Nintendo Switch users or anyone with an older gaming console will need a capture card regardless.
Capture cards come as either internal or external. Internal capture cards can only be used with a desktop computer. They are faster than external capture cards but more expensive. External capture cards are more portable but run slower, especially on Xbox or Playstation. When choosing a capture card, you should also decide if a max resolution of 1080p will suffice, or if you want to spring for the 4K. And make sure to purchase a device that records both the game sounds and your live commentary via headset or microphone.
Here’s a look at the 5 best video capture cards for gamers:
1. Elgato HD60 S+
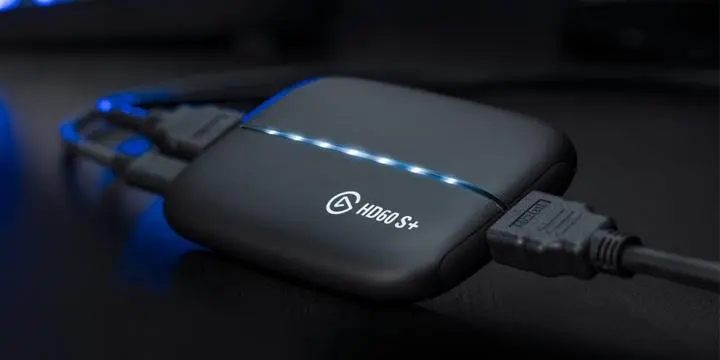
Elgato is a well-known name in gaming and streaming software. Their HD60 S+ is an external capture card that is easy to use, has a simple user interface, and works with gaming consoles, laptops, or desktops. It captures video at 1080p, but the passthrough quality is 4K. With this capture card, you can record unlimited footage, and even save footage retroactively.
2. Elgato 4K60 Pro
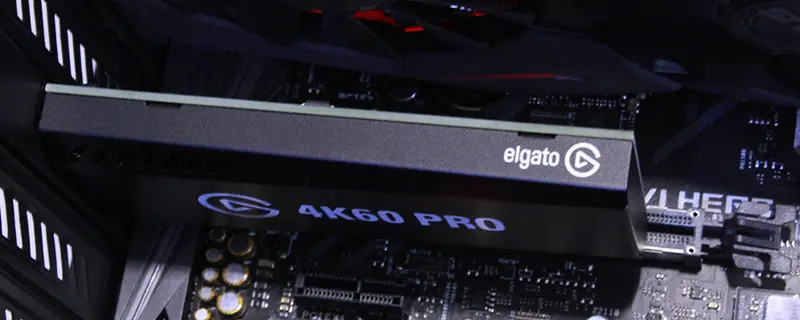
The Elgato 4K60 Pro is an internal capture card with 4K quality capture and passthrough. It is more expensive and requires more expertise than the Elgato external capture card above. Still, for anyone who uses a gaming desktop for live streaming, higher quality is a must. With this capture card, you can capture video in multiple apps at once and slot several 4K60 Pro cards into one PC.
3. Avermedia Live Gamer Duo
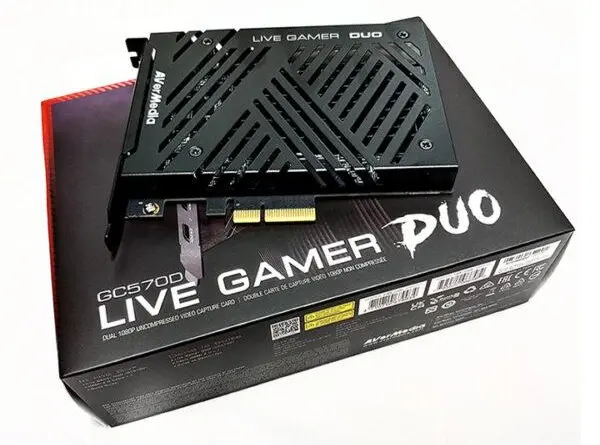
Live Gamer Duo from Avermedia has 2 HDMI inputs, so you can capture or stream 2 sources at once, such as gameplay and camera footage. Capture quality is 1080p at 60FPS, with passthrough quality up to 4K. This capture card is pricey, and works best for serious streamers, to help minimize their streaming setup.
4. Hauppauge HD PVR Pro 60
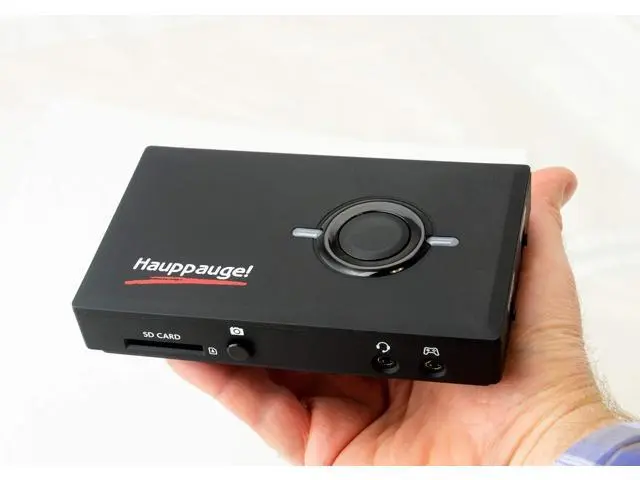
Hauppauge’s HD PVR Pro 60 is filled with features at a reasonable price. It has a built-in audio mixer for multi-player chat, game commentary, and game audio. The capture card has multiple ports to connect your gaming headset, gaming controller, HD video camera, PC, and 4K game console. There’s also an SD card slot, so you can game on the go!
5. Evga XR1 Lite
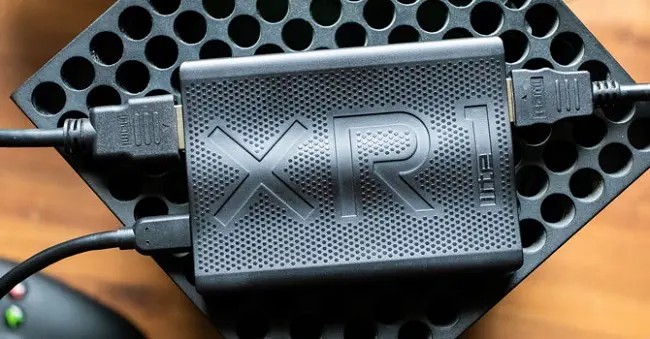
The Evgais XR1 Lite is the most affordable capture card on our list. It offers 4K pass though, 1080p capture, and is OBS certified. It connects to your PC, gaming source, monitor, or DSLR camera. This is a great option for beginners who aren’t ready to shell out hundreds of dollars for equipment. Evga XR1 Lite is simple to use, and its compact design won’t take up valuable desk space.
Camera
Another key step in learning how to record gameplay on PC is deciding if you want to record yourself during gaming. We recommend it, as it adds a personal touch to your gaming videos.
When choosing a camera, you need to decide if you want to use a webcam or a DSLR/Mirrorless camera. Major camera brands such as Canon, Sony, and Panasonic have camera capture software that will allow users to record and live stream with their DSLR or mirrorless cameras without adding additional hardware, as in years past. As long as you have a flip-around screen so you can see yourself, a dedicated camera will work for gaming. Cameras offer higher quality, however, they are more expensive and bulkier than webcams.
Webcams are small, easy to use, and relatively inexpensive. They are the preferred choice of most gamers and live streamers.
1. Logitech StreamCam
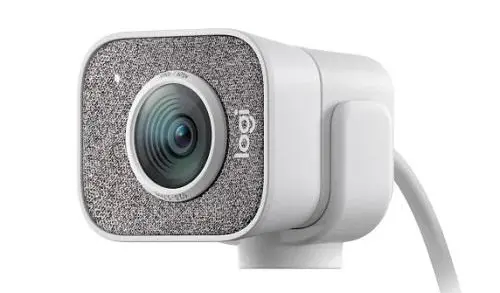
Logitech StreamCam is the best webcam for gamers, streamers, and content creators. It is reasonably priced and offers high-quality output up to 1080p with little user input. StreamCam has a face tracking feature and autofocus - so you are always in the shot and in focus, no matter what. Automatically rotate your camera between landscape and portrait orientation, and manually move the mount down to capture your hand movement. It can also be mounted to a tripod if desired. The only downside to the Logitech StreamCam is that it is not great in low light.
2. Razer Kiyo Pro
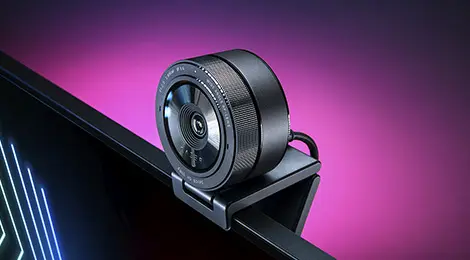
The Rizer Kiyo Pro is one of the best webcams for recording in low light. Older versions had a distracting ring light that did little to illuminate a dark room. Razer Kiyo Pro has an adaptive light sensor that works much better. It also has a wide-angle lens with an adjustable field of view (80, 90, or 103 degrees). It comes with an omnidirectional microphone, that while powerful, picks up a lot of background noise (see below for good microphone options). It is one of the most expensive 1080p webcams, pricing itself closer to what you’d expect from a 4K webcam.
3. Canon EOS M50 Mark II
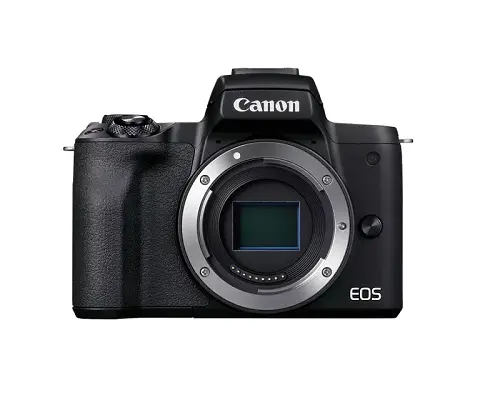
The Canon EOS M50 Mark II is one of the most affordable mirrorless cameras for gamers. It captures video resolution at 4K UHD (although the 4K video is annoyingly cropped). It offers interchangeable lenses, for gamers who want to achieve the perfect look in their videos. It has a built-in microphone, but we suggest serious streamers use their own. Other features include vertical video, touch record control, and a self-timer. This camera can be paired with Canon’s EOS Utility webcam software, an app that communicates with your camera to perform functions such as downloading and displaying images, remote shooting, and adjusting camera controls.
4. Elgato Facecam
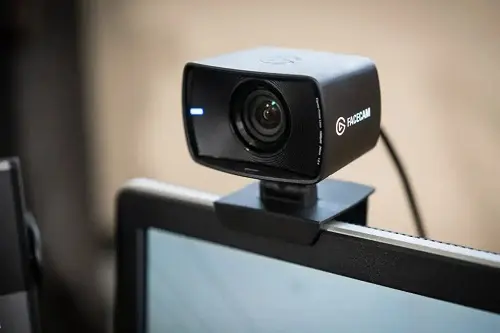
The Elgato Facecam is a webcam that acts like a DSLR camera. While it only records up to 1080p, its Camera Hub software allows users to manually tweak settings such as brightness, motion, and noise. This is especially helpful when shooting in low light. Even set to auto, the webcam does a good job of adjusting settings and delivering crisp video. The 82-degree field of view is nicely wide with no added fisheye effect. Facecam was created with the creator in mind and left off a built-in microphone in favor of other features.
5. CASECUBE 2K
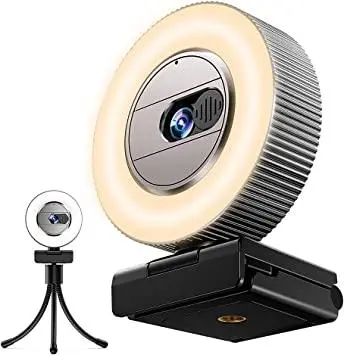
CASECUBE 2K is an affordable webcam with a flexible setup. You can pan/tilt the webcam horizontally 360 degrees and vertically 90 degrees. It also comes with a tripod stand and a 50ft cord to fit any possible setup. CASECUBE 2K has a noise-reducing built-in microphone and a built-in privacy cover. Attached to the face is a ring light with 2 color modes, and each mode has 3 levels of brightness, making it another good option for recording in low light.
Webcam Software
To include a video overlay of yourself gaming and giving commentary, you’ll need webcam software. We recommend YouCam as the best software to live-stream, record, and enhance webcam footage.
Compatible with popular live-streaming services including Twitch, YouCam enables you to engage with your followers in a unique way. Whether you are a seasoned pro, or just learning how to record gameplay on PC for the first time, you can apply more than 200 augmented reality effects, custom images and titles, and even real-time makeup and skin enhancements to help you look camera-ready. With YouCam, you can blur or replace your background and use facial tracking, so you always remain in the shot.
Running all that equipment at once - gaming console, capture card, webcam, screen recorder, etc., can use a lot of computer resources. But YouCam uses significantly less power and CPU than competitors, so it won’t drain your battery or cause lag.

What other camera app can do all of that? Download YouCam today by clicking the button below.
Headphones
If you are in the market for a gaming headset, ask yourself if you’ll be using the headset’s microphone, or if you plan to detach it and use a professional mic. Some headsets have less-than-stellar mics, which are fine for chatting with friends, but not for recording commentary. Others have a non-detachable mic, which would be annoying if you don’t plan to use it.
Other factors to consider are battery life and comfort (especially if you regularly have marathon gaming sessions), and of course budget. Oh yeah, and stellar sound quality, so you can hear every detail of your game come to life.
1. Razer BlackShark V2
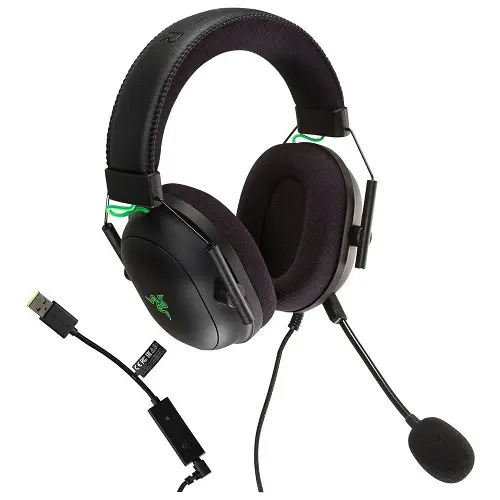
Blackshark V2 headphones from Razer are not only the best wired headphones around but are also at a great price. They are also comfortable, easy to use, and offer excellent sound quality. They feature a detachable, noise-canceling mic, and THX profiles offering excellent surround sound (while THX is great for movies and music, there aren’t that many THX-supported games). If you prefer wireless, Blackshark V2 has a wireless Pro version that’s somewhat pricier.
2. SteelSeries Arctis 7P/7X
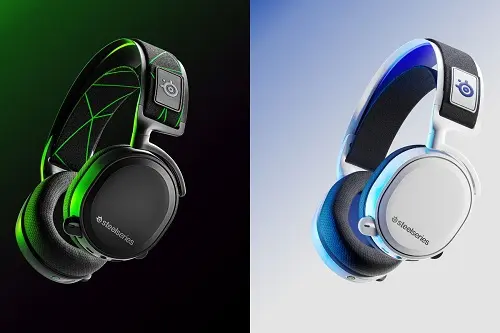
This wireless gaming headset was designed for use with Xbox Series X|S but is also compatible with almost every gaming system. It’s comfortable enough for a marathon gaming session and has a 24-hr battery life, so you won’t have to cut it short. The SteelSeries Arctis 7P/7X comes with a bidirectional microphone and a reasonable price tag, although it’s still more expensive than our top pick, Blackshark V2.
3. HyperX Cloud Alpha Wireless
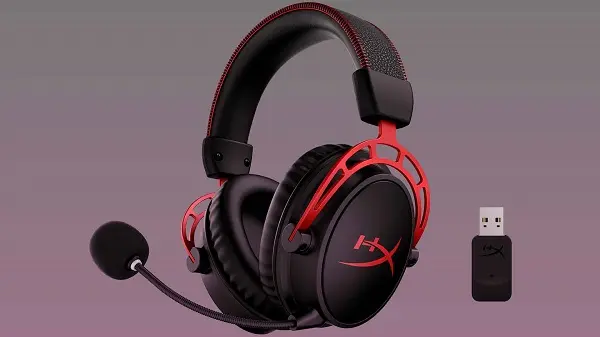
HyperX Cloud Alpha Wireless headphones have a battery life of 300 hours - the longest battery life of any headphones on our list. And probably on any list of wireless headphones ever made. Add that to incredible comfort and you may go on a gaming bender for days. They also offer excellent sound quality, allowing gamers to hear every nuance of a game with precision. However, the bidirectional detachable microphone is not as good as you might expect from these otherwise stellar cans.
4. Razer Kraken X
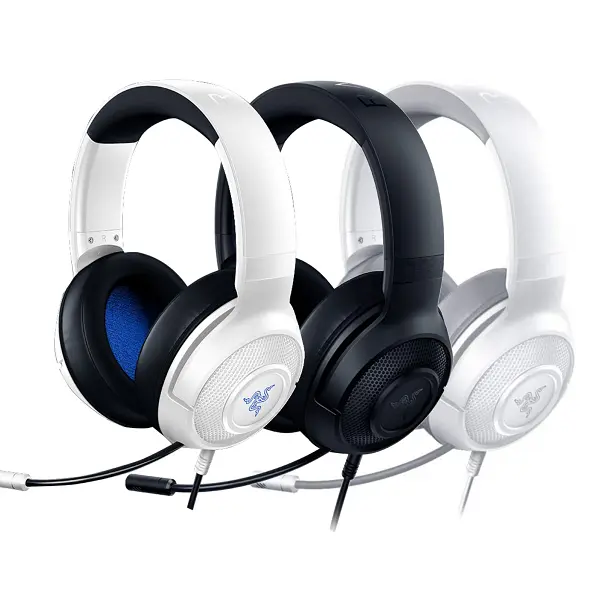
Razer Kraken X headphones are the most budget-friendly on our list by far. While they don’t really compete with more expensive offerings, they provide excellent 7.1 virtual surround sound. They are also ultra-lightweight and comfortable (and come in 3 colors!), making these headphones a great option for a beginner on a budget. Our biggest issue with Razer Kraken X is that the built-in microphone is not detachable.
5. Beyerdynamic MMX 100
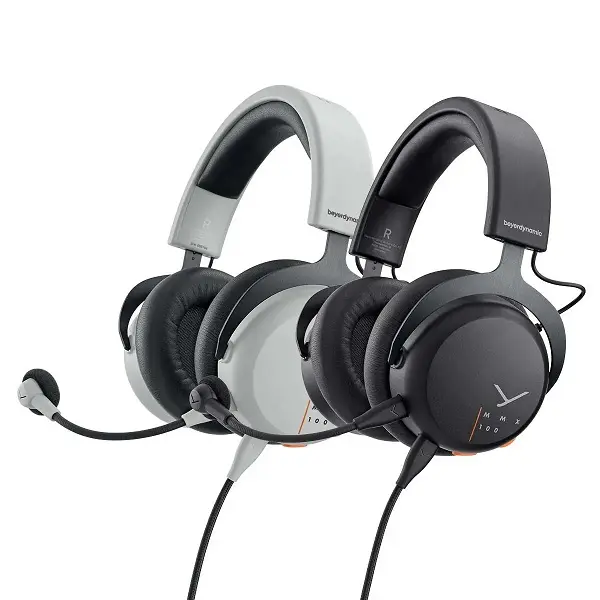
Beyerdynamic MMX 100 headphones are not only affordable, but they might save you from having to buy a separate microphone. The detachable cardioid condenser mic allows your voice to come through crystal clear while eliminating keyboard and mouse clicks. The headphones are also comfortable, and fully compatible with PC, XBOX, PlayStation, and Nintendo Switch.
Microphone
If you want to learn how to record gameplay on PC with live commentary, you’ll need a quality microphone. You can use the microphone on your gaming headset, but the microphones below will give you professional-caliber audio. For best results, record your voiceover separately from the gaming footage and then combine them during the editing process.
Before you choose a microphone, you’ll need to know the different types available. The first thing to know is the difference between XLR and USB microphones. XLR mics can’t connect directly to your PC, they need a separate audio interface. XLR mics are a must for professional musicians or voice-over artists, but not really necessary for gaming or streaming. For gaming, we recommend a USB mic, which can plug directly into your computer and is more budget-friendly.
The next thing you need to decide is what kind of polar pattern you need, meaning from which direction the mic will pick up sound. An omnidirectional microphone will capture sound from every side. This is a good choice for a round table interview, but not so much for gaming. An omnidirectional mic will pick up all background noise, like the hum of your pc or the sound of your hands clicking keys. A bidirectional mic picks up sounds from the back and front, but not the sides, and a cardioid mic picks up sound from the front, but not from the back or sides. We recommend a cardioid mic for gaming commentary.
1. Shure MV7 Podcast Microphone
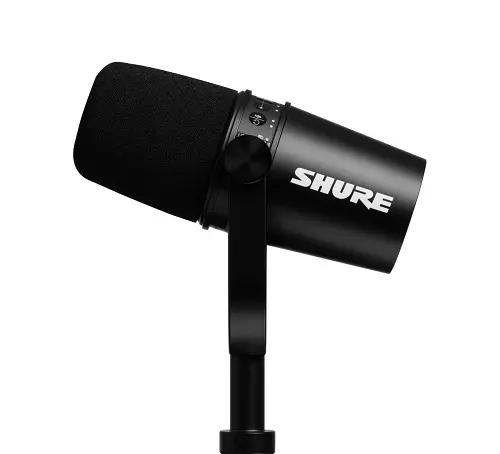
The Shure MV7 Podcast Microphone is a hybrid USB/XLR mic that gets the best of both worlds. You get the ease of a USB connection, with the adaptivity and sound quality of XLR. It has a cardioid polar pattern. Shure is known for making professional sound gear for musicians, and this is their first microphone specifically for content creators. This mic is very versatile and has amazing sound quality, however, you will have to pay more for a mic of this caliber.
2. Blue Yeti X
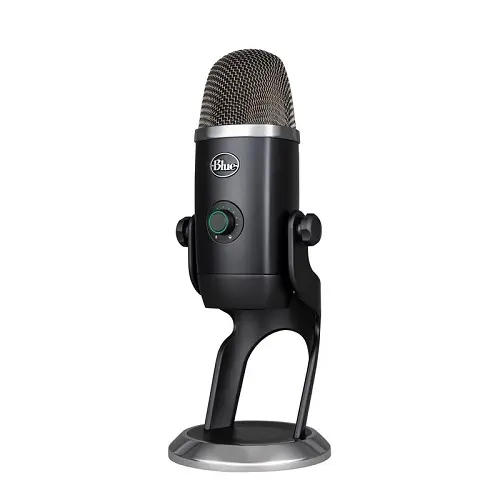
The Blur Yeti X is a USB mic with multiple polar patterns - Omnidirectional, bidirectional, cardioid, and stereo, so you can use it in any recording situation. The mic is easy to use, and the polar patterns can be switched with the touch of a button. The front panel is lit by LED and allows you to adjust the volume of how others hear you, the volume of others in your headphones, and how loud you sound in your headphones. It’s priced around the middle of professional and budget mics.
3. HyperX SoloCast
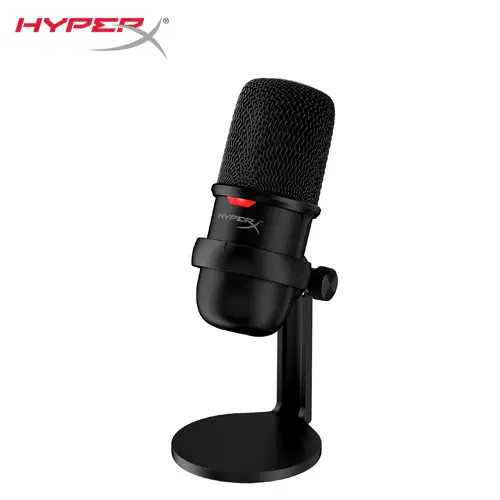
HyperX SoloCast is a USB mic with a cardioid polar pattern. It is very easy to use, with a top-to-mute sensor and an LED light to tell you whether or not you are broadcasting. The adjustable swivel stand will work in any possible setup. This mic is very budget-friendly, and the sound quality rivals that of its more expensive big brother, the HyperX QuadCast.
4. Elgato Wave:3
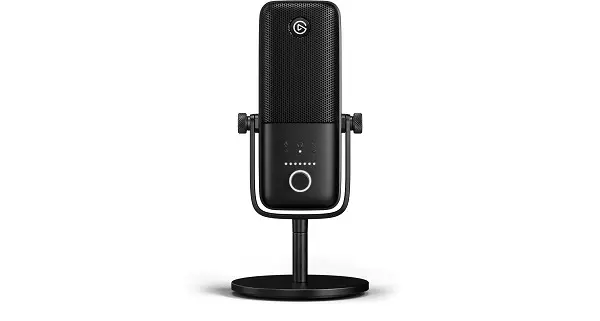
The Wave:3 mic from Elgato is another USB/cardioid mic that is priced similarly to the Blue Yeti. This condenser mic comes with many features, such as a multi-layered noise shield to stop plosives, and Clipguard technology to keep volume levels from peaking. It comes with sound mixing software and 9 independent input channels, so you can mix commentary, game audio, and more.
5. Razer Seiren Mini
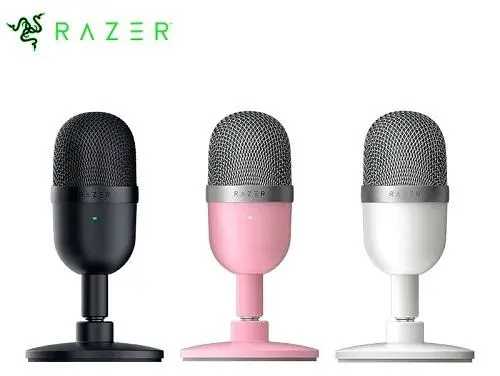
The Razer Sieren Mini mic is an ultra-compact condenser mic that comes in pink, black, or white. It offers the best sound quality at this budget-friendly price point. It connects to your PC easily with a USB and has a supercardioid polar pattern. It has a tilting stand and a built-in shock mount to ease the vibrations caused by accidental bumping. The Sieren Mini doesn’t offer a ton of features, but this highly portable mic gets the job done.
How to Record Gameplay on PC
To learn how to record gameplay on PC, download PowerDirector with Screen Recorder 4 by clicking the button below. Then follow along with these steps:
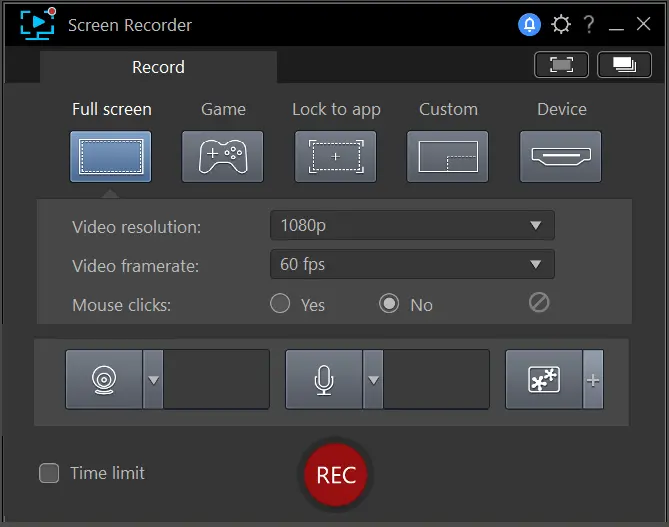
- Open PowerDirector in Full Mode and click the Plugins menu in the top toolbar and select Screen Recorder. Then decide what part of the screen you want to capture.
You can choose to capture the whole screen, just the game you are playing, just the app you are using, or a custom frame.
- Next choose video resolution, frame rate, and whether you want to record mouse clicks. Most gamers opt for 1080p and 60fps but depending on your PC’s ability to support gaming and recording simultaneously, you may want to raise or lower the resolution.
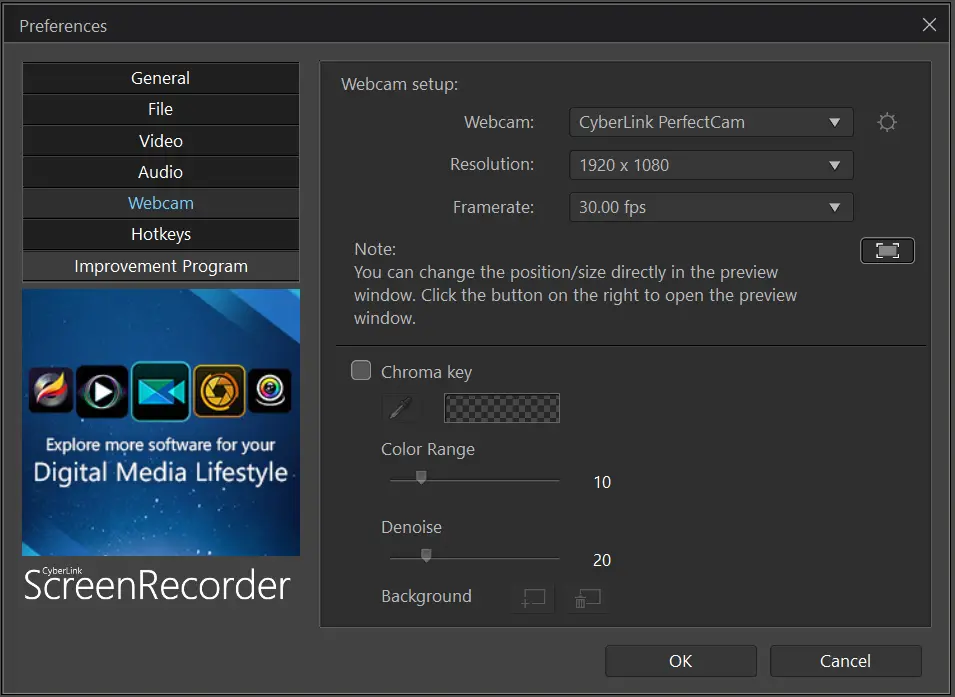
- Connect your webcam, then select it from the Webcam Dropdown Menu. Adjust the video resolution and frame rate just like you did in the device capture settings. You can also tweak settings such as color range, de-noise, and chroma key for a green screen effect.
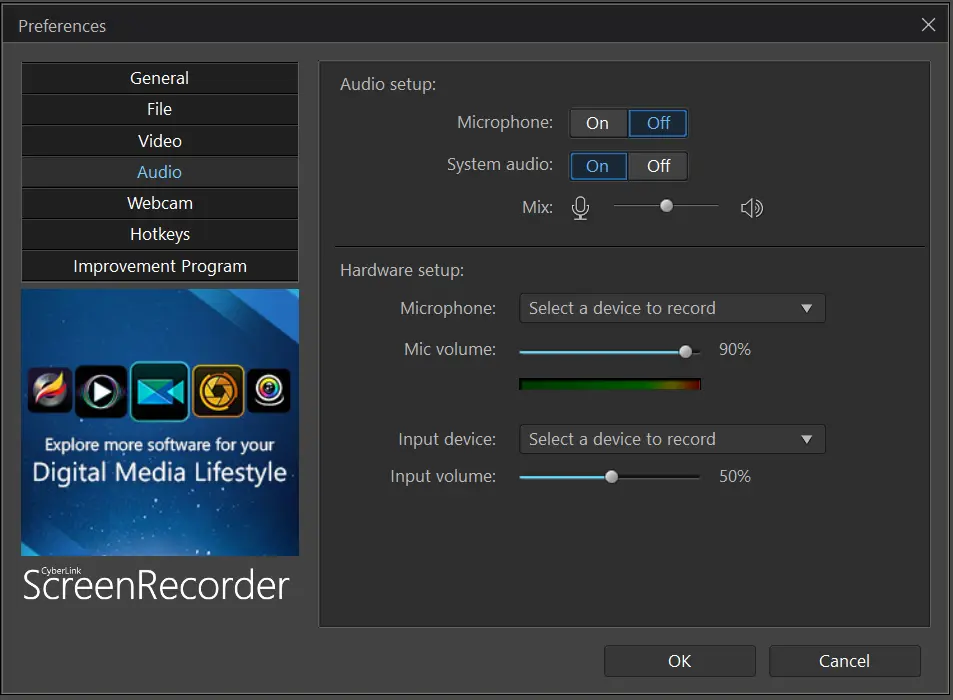
- To adjust the volume of your microphone for the recording, select the microphone you want to use from the Microphone Dropdown Menu. Then drag the cursor to increase or decrease the volume.
- If you have webcam footage of yourself playing the game and providing commentary, click the Video Overlays button in the bottom right corner of the panel, then click Insert Image and upload the footage from your computer.
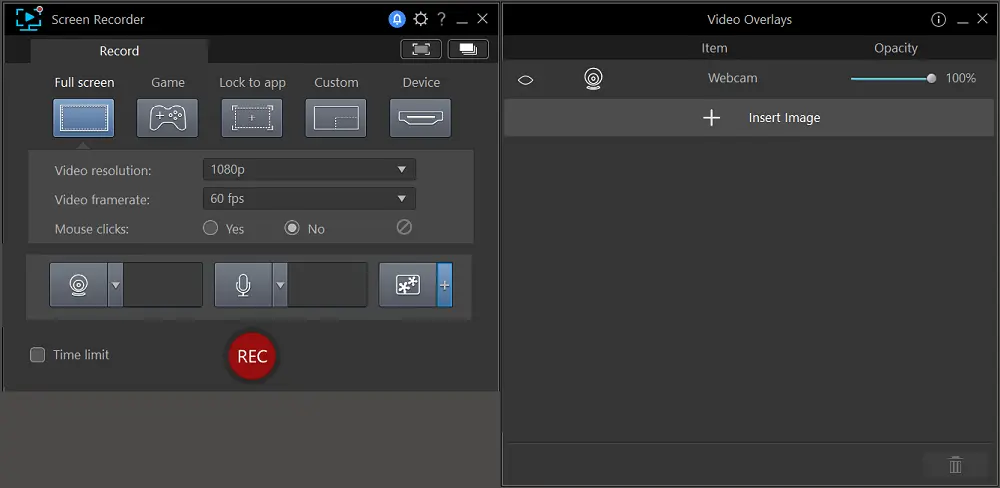
- Click the Rec button to start recording your screen. You can click Stop or hit the F9 key to pause or end the recording at any time.
Now that you’ve learned how to record gameplay on PC, let’s take a look at recording from a gaming console.
How to Record Gameplay on a Gaming Console
Download PowerDirector with Screen Recorder 4 by clicking the button below. Then find out how to record gameplay on PC with a gaming console by following these steps:
- Plug the HDMI cable from your console into your video capture card’s input port. Make sure you also plug an HDMI cable from the capture card’s output port into your monitor. Next, connect the capture card to your PC using a USB cable.
- Open PowerDirector in Full Mode and click the Plugins menu in the top toolbar and select Screen Recorder. Then click Device and select the capture card you just connected.
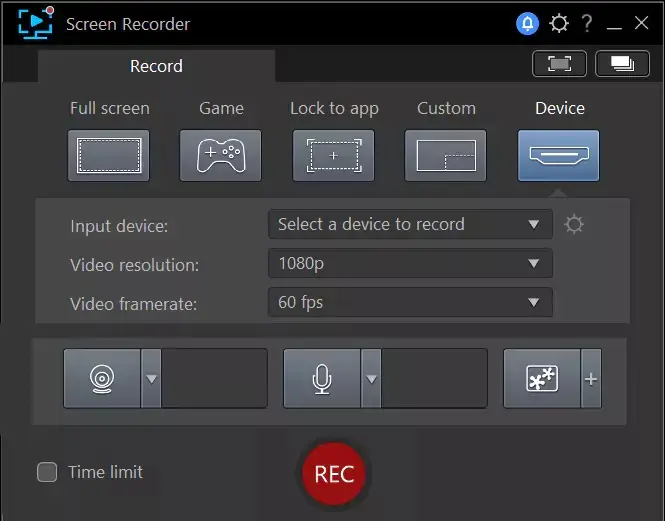
- Connect your webcam, then select it from the Webcam Dropdown Menu. Adjust the video resolution and frame rate just like you did in the device capture settings. You can also tweak settings such as color range, de-noise, and chroma key for a green screen effect.

- To adjust the volume of your microphone for the recording, select the microphone you want to use from the Microphone Dropdown Menu. Then drag the cursor to increase or decrease the volume.

- If you have webcam footage of yourself playing the game and providing commentary, click the Video Overlays button in the bottom right corner of the panel, then click Insert Image and upload the footage from your computer.

- Click the Rec button to start recording your screen. You can click Stop or hit the F9 key to pause or end the recording at any time.
How to Edit Gameplay With PowerDirector
Now that you know how to record gameplay on PC, you need to learn how to edit your gameplay. To keep viewers interested, edit your clips so that only the most exciting, funniest, or important moments remain. Open PowerDirector and follow along:
- Import all your various video clips and audio clips into PowerDirector in one fell swoop by clicking the File Folder icon in the top left corner or right-clicking anywhere in the media window.
To streamline the process, we recommend gathering all your footage into one media folder on your computer beforehand so that you can import one single folder.
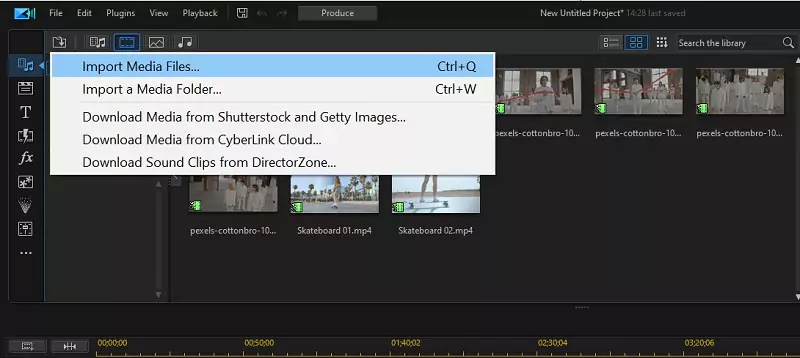
- Drag and drop your footage onto the Editing Timeline.
- Trim clips as necessary by dragging a clip’s beginning and end. If you need to split footage in the middle, you can cut a clip apart by clicking the Split button in the top left corner of the timeline. Drag a clip to move it around on the timeline.
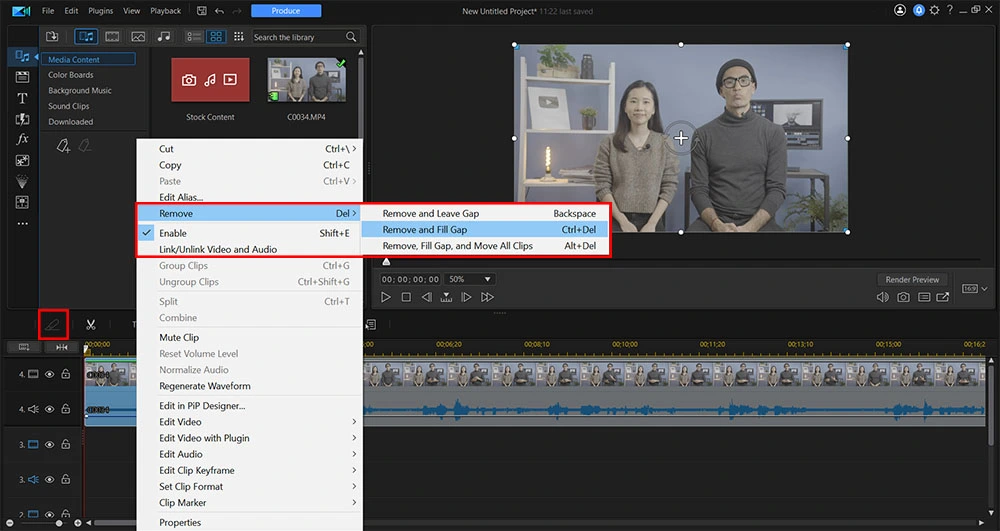
You can carry out this same process with your audio footage in the audio track until you’re only left with the footage you want.
- Add titles to give your gameplay a professional edge. To add a title, click the T icon in the top left sidebar and select a title. If you want more title options, you can download free templates from DirectorZone at any time by clicking on the blue download folder in the Title Template menu. When you find a title template you like, drag and drop it onto the timeline.
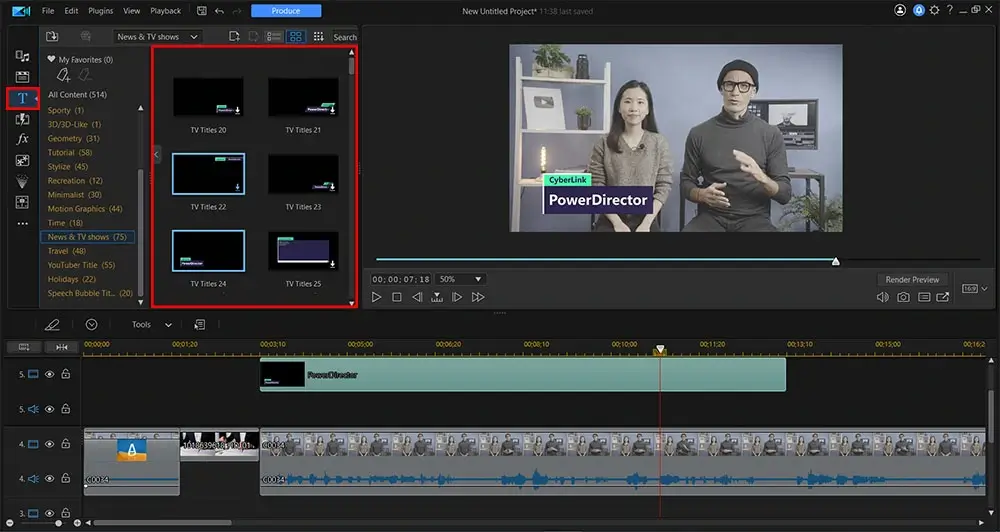
- Double-click on the title to open Title Designer, where you can change the title and the font, as well as the font color, size, and position.
- Now add transitions to create a smooth flow between clips. In the left sidebar, click on the Transition icon, located right below the Title icon. Click on different transitions to preview them, and when one strikes your fancy drag and drop the transition between any two clips on the timeline.
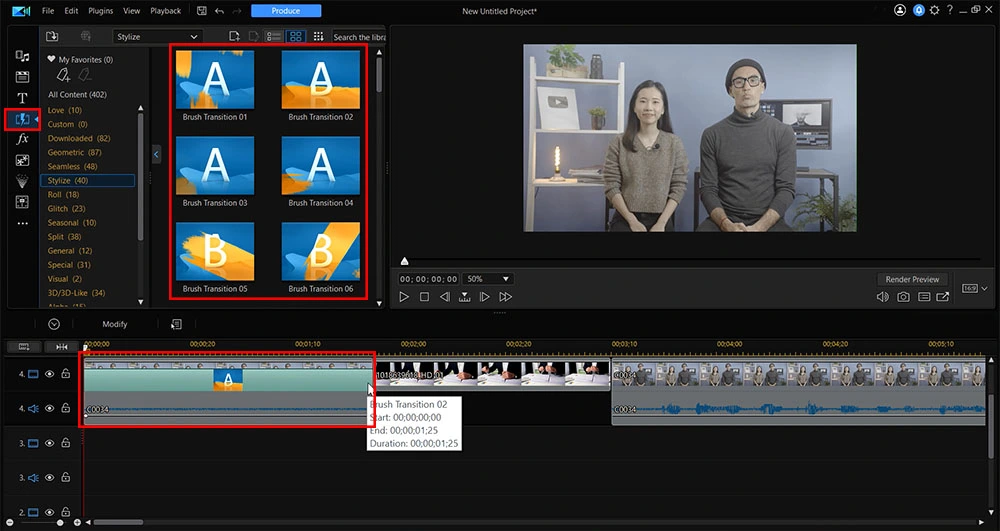
To adjust the duration, drag the transition’s start and end points, or double-click on the transition to open the Transition Settings window.
Note: You can also add free background music from Shutterstock by dragging it onto the timeline, but we recommend keeping it at a low volume, so viewers won’t struggle to hear your commentary or the sounds of the game.
- Click Produce in the top left and choose your desired file format.
Tips for How to Record Gameplay on PC
We’ve given you a ton of information on how to record gameplay on PC. We’ve broken down the most important things you need to know into 3 simple tips:
Tip 1: Make sure your PC can handle recording gameplay.
Not all PCs are the same, so even if you follow all of the settings we recommend in our How to Record Gameplay on PC section, you may have to adjust the bitrate and framerate accordingly to get the best results. Or invest in a PC with a higher CPU.
Tip 2: Get the right gear.
Recording gameplay can involve a lot of gear. To keep costs down, make sure you understand what is and is/is not necessary before spending hundreds of dollars on gear you don’t need, or the wrong type of gear. You should also make sure anything new you buy will be compatible with the gear you already own.
Tip 3: Edit your gaming footage.
Your viewers don’t need to see the 5-minute log-in process before you start gameplay. Or the 15 lives you lost before you finally beat the level. Trim your footage to take out boring or unnecessary parts. Your videos will also look polished and professional with added titles, overlays, transitions, sound effects, and more.
Download the Best Gameplay Recording Software for Beginners
If you want to learn how to record gameplay on PC and make high-caliber gaming videos, using PowerDirector with Screen Recorder 4 and YouCam webcam software will help you do just that.
PowerDirector with Screen Recorder 4 provides the screen recording AND editing software every gamer needs to create quality, engaging videos. PowerDirector has the perfect tools for gamers, including special effects, pre-made animated titles, motion tracking, overlay, and chroma key. It also has access to royalty-free stock images, videos, sound effects, and music to put the finishing touches on your gameplay. Most importantly, this software has a reduced system footprint, minimizing CPU and GPU for ultra-smooth gameplay.
YouCam is a feature-rich webcam software with facial tracking, skin and make-up enhancements, and fun effects.
Are you ready to begin recording top-notch gaming videos for Twitch or YouTube? Click the buttons below to download PowerDirector and YouCam today and get started!


How to Record Gameplay on PC FAQ
You can use QuickTime to record gameplay on Mac following these steps:
- Go to the QuickTime application and choose File/New Recording.
- Hit the Triangle beside the Record button to choose the recording settings.
- Start your game and select the area of the screen you want to record.
- Click the Record button to start recording gameplay on your Mac.
- When you are done, click the Black button in the menu bar to stop recording.
If you want to learn how to record gameplay on PC and create engaging content, look for game recording and editing software with the below features.
- Green screen effect
- Picture-in-Picture
- Titles
- Transitions
- Royalty-free stock libraries
- Choose which part of your screen to capture
- Capture game sounds and commentary
- Direct upload to popular gaming and streaming sites
- Logo overlay
- Live streaming capability
If you’re looking for game recording software that checks all these boxes, we recommend PowerDirector with Screen Recorder 4.
- PowerDirector
- iMovie
- Splice
- Quik
- Kinemaster
To learn more about the above apps, check out our article Best Free Video Editing Apps in 2026.
If you ask a YouTuber how to record gameplay on PC, they will give you one answer: PowerDirector with Screen Recorder 4. Using PowerDirector with Screen Recorder 4 is a budget-friendly and beginner-friendly way to record and edit gameplay in one package. This software is also packed with features every gamer needs and offers direct uploads to YouTube, YouTube-specific aspect ratios, and pre-made templates for YouTube intros and outros.
If you want to know how to record gameplay on PC, then downloadScreen Recorder 4. This screen recorder minimizes CPU and GPU so your gameplay and live streaming are smooth. It offers multistreaming to your favorite platforms and even to custom servers. With Screen Recorder 4, you can integrate webcam footage, add an overlay, and change your background.
No. You only need a capture card to send recordings from a gaming console to your PC. If you are gaming on a PC and your PC is having trouble with the amount of CPU being used, then try a 2-PC setup.
The only reason you would need a capture card when recording a PC game is if you are adding in footage taken on a DSLR camera. If you are using a webcam to record footage, you won’t need one.
If you are learning how to record gameplay on PC, you should know that both Bandicam and OBS are suitable for recording gameplay and live streaming. They come with different strengths and features, so find the right one for your needs.
OBS is best for Mac and Linux users (Bandicam is only compatible with Windows), gamers on a budget who need free software (Bandicam is paid), and video formats MKV, FLV, Webm, and Mov (Bandicam only supports MP4 and AVI). Also, if you require multiscreen recording, OBS is a better option.
However, Bandicam is best for beginners (it is significantly easier to use than OBS), and offers more screen recording features (such as annotation).
The Cyberlink Editorial Team creates in-depth articles on video editing, multimedia innovation, and AI-powered creative tools. Our mission is to provide practical, easy-to-follow tutorials across video and photo editing, while showcasing AI features, product insights, and industry trends that empower creators around the world.


