How to Whiten Teeth in Photos for Free [Windows, Mac]

“3…2…1…smile!”
Most people instinctively smile when someone points a camera at them, often showing their teeth. Unfortunately, sometimes cameras capture colors incorrectly, causing your teeth to look more yellow than they are.
If your teeth look yellow or dull in photos, you may hesitate to share them with others. Thankfully, you can whiten teeth in photos with editing software.
If you’ve never used an image editing program before, you may falsely believe whitening teeth in a photo is complicated and time-consuming. This couldn’t be further from the truth. Modern editing programs make it easy to whiten your teeth with a few clicks.
There are dozens of editing programs that allow you to whiten teeth. While these will get the job done, some require more editing knowledge and experience than others. If you’re looking for the perfect teeth whitening photo editor for beginners, we recommend using PhotoDirector .
PhotoDirector is a user-friendly editing software with several beauty retouching tools that allow you to improve your appearance in photos while creating a natural finish. All you have to do is select the teeth you want to whiten and set the strength of the effect. The software will do the rest.
Download PhotoDirector for free and give it a try by following the step-by-step how-to below.
Continue reading to learn how to whiten teeth in a photo with PhotoDirector and YouCam Makeup.
- How to Whiten Teeth in a Photo on Windows and Mac
- 5 Other Touch Up Tools You Should Know About
- Best Photo Editor to Whiten Teeth Free Download
- Teeth Whitening Photo Editor FAQs
How to Whiten Teeth in a Photo on Windows and Mac
Here's a step-by-step guide for how to whiten teeth in pictures using PhotoDirector:
- Download PhotoDirector for Windows or Mac: You can download PhotoDirectorfor free if you don't already have it.
- Import your photo: Next, you need to open PhotoDirector and upload your image. You can add several pictures to the PhotoDirector library and edit them individually.
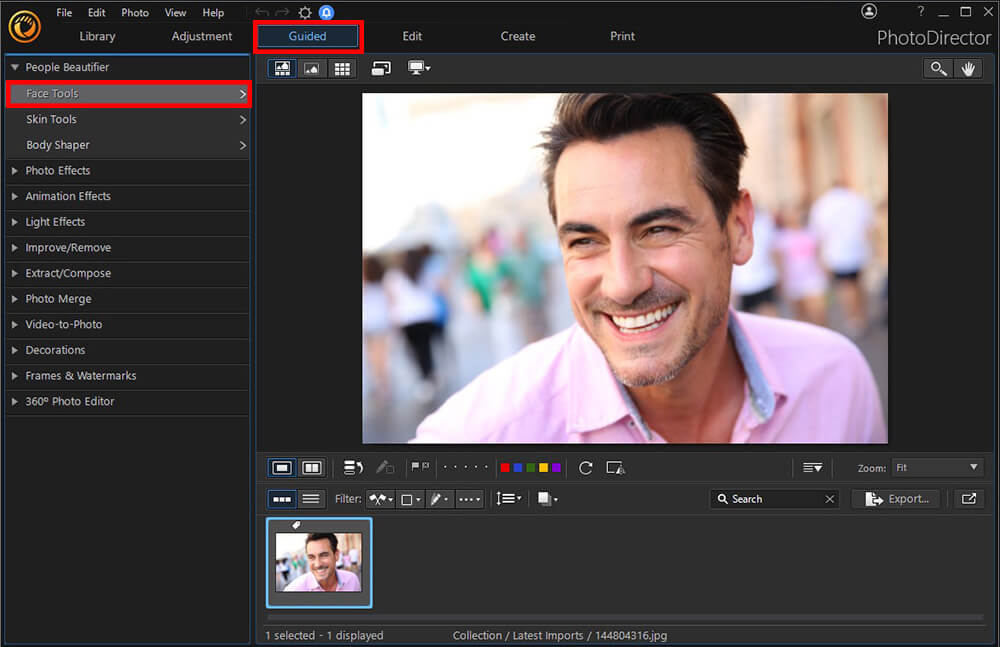
- Navigate to “Guided”: Once you have your desired photo in the editor, click the “Guided” tab at the top of the page. Doing so will take you to a page of all of the guided editing tools in the PhotoDirector interface.
- Select “Face Tools”: Next, click “People Beautifier,” then “Face Tools.” You will now see a list of beautifying tools that you can use to enhance your photo.
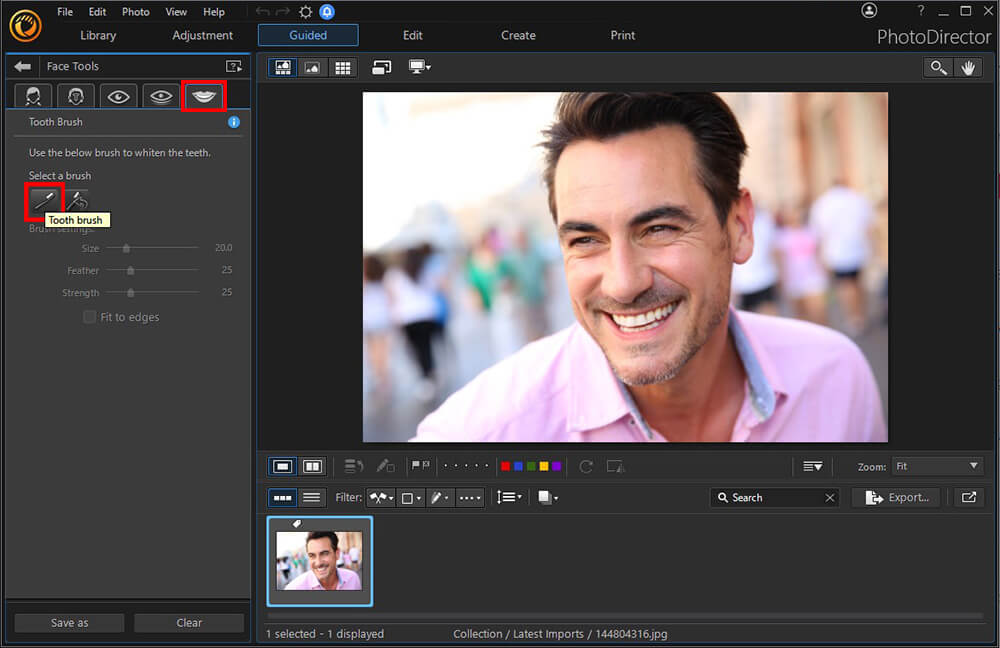
- Select the “Tooth Brush” tool: The “Tooth Brush” tool is the brush you will use to whiten the teeth in your photo. The icon for this tool resembles a cartoon smile. Once you click on this icon, your cursor will change to a brush that you can use to whiten the teeth manually.
- Adjust the brush settings: Before you begin whitening the teeth with the brush, you can use sliders to adjust the size, feather, and strength of the effect. Here is a detailed description of what each of these means:
- Size: Adjusts the size of the brush. We recommend starting with a smaller brush to apply more precise brush strokes around the edges of the teeth.
- Feather: Adjusts the transition between the brushed area and the surrounding areas. Increasing the feather can create a more natural appearance by smoothing the line between the whitened teeth and the rest of the face.
- Strength: Adjusts the intensity of the Tooth Brush tool. We recommend placing the strength somewhere near the middle of the slider to make the whitening look natural.
- Select “Fit to edges”: We recommend selecting the “Fit to edges” option to limit the whitening to nearby areas with similar properties. This effect can help you contain your whitening within the edges of the teeth.
- Click and drag to apply the brush: Finally, you can begin whitening the teeth using your cursor like a brush. If needed, you can zoom in on the photo to view the teeth better. You can also click the eraser icon to erase areas you accidentally brushed.
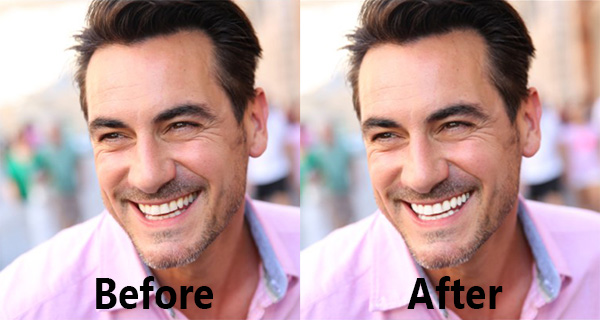
- Save and export your photo: We recommend spending a few minutes adjusting your teeth whitening to ensure a natural appearance. Once you're happy with the teeth whitening effect, you can save your changes and export your picture.
5 Other Touch Up Tools You Should Know About
If you're going to spend time whitening your teeth with an editing program, you may as well touch up a few other aspects of your appearance while you're at it. Here are five other touch-up tools available through PhotoDirector that you can use to enhance your appearance.
1. Face Shaper
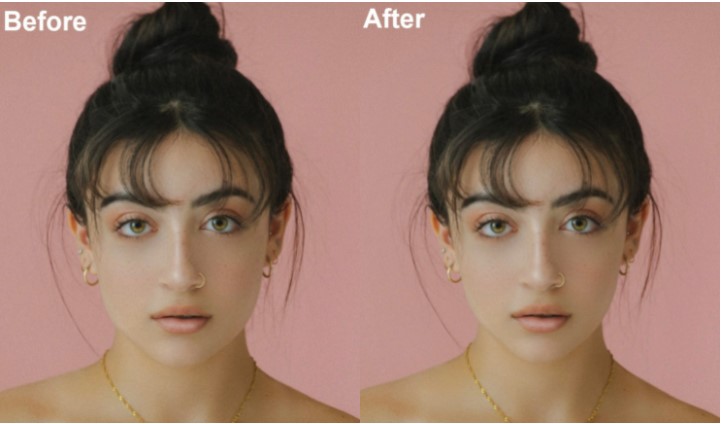
The Face Shaper tool allows you to alter your face shape to create a more symmetrical appearance. Studies have shown that people find symmetrical faces more attractive than asymmetrical ones. Therefore, changing your face shape may make you look more pleasing overall without producing a noticeably altered effect.
PhotoDirector makes it easy to achieve a symmetrical face shape by showing you feature points that should align on your chin and the sides of your face. Then, you can drag a slider to adjust your face shape to conform to these feature points.
To learn more about face shaper check out 3 Best Face Editor Tools for Photo Touch-Ups.
2. Wrinkle Remover

PhotoDirector's Wrinkle Remover tool can allow you to remove wrinkles and other blemishes from your photos instantly. This tool lets you use a small brush to smooth specific areas of your face, reducing the appearance of wrinkles. You can find the Wrinkle Remover tool in the “People Beautifier” section of PhotoDirector.
3. Red-Eye Removal
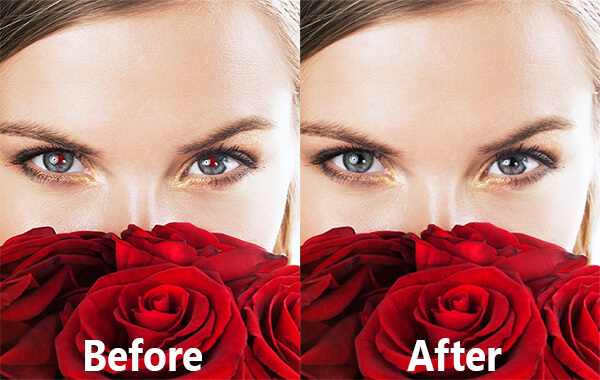
Sometimes, when you take a photo of someone in a dark room with a flash, their eyes look red in the picture. If you ever notice the red-eye effect, you can use PhotoDirector to restore a person's eyes to their natural appearance.
PhotoDirector's red-eye removal tool is easy to use. You select the eye you want to correct, then let PhotoDirector auto-detect the redness and replace it with a natural-looking eye.
You can find this tool under “Adjustment” > “Manual” > “Regional Adjustment Tools.”
For a more in-depth guide check out How to Remove Red Eye in Your Pictures for Free.
4. Skin Smoother
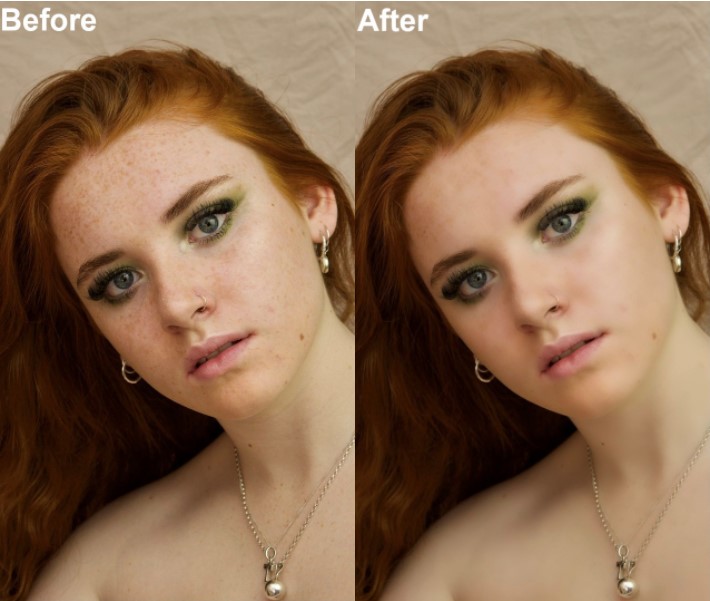
The Skin Smoother tool is similar to the Wrinkle Remover tool in that it can help you eliminate blemishes on your skin. However, this tool gives you more precision by allowing you to adjust the feather, smoothness, and detail within the effect. You can apply this brush to your entire face to give it a smooth, blemish-free appearance.
For more information on skin smoothing check out 3 Tips to Touch Up Photos.
5. Body Shaper
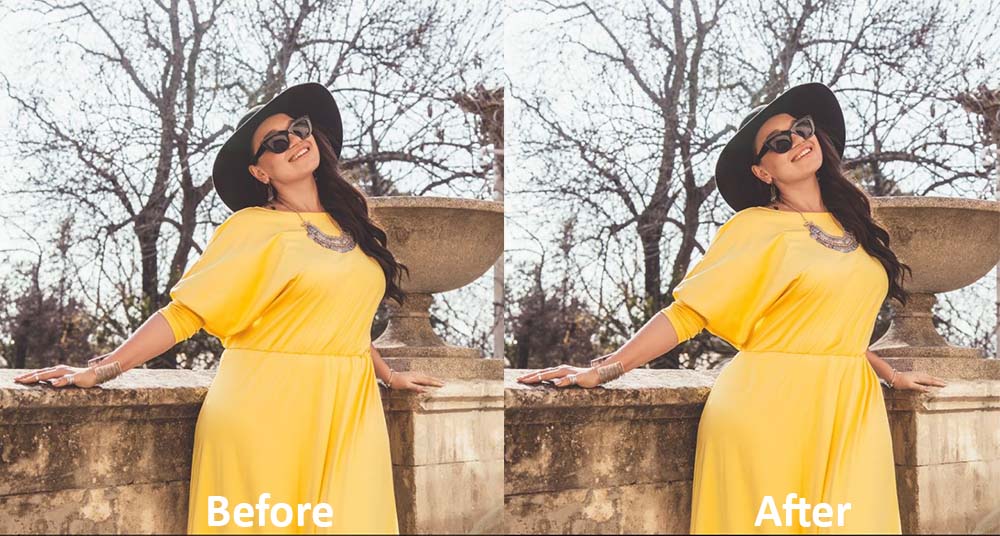
PhotoDirector's Body Shaper tools can allow you to adjust the shape and size of a person within your photo.
There's an old saying that the camera adds 10 pounds, and as such, many people don't like how their bodies look in photos. If you're dissatisfied with your body shape in an image, you can use this tool to slim yourself down while maintaining a natural appearance.
Best Photo Editor to Whiten Teeth Free Download
Taking portrait photos where your smile isn't pearly white can lower your confidence and make you hesitant to share the image with others. Thankfully, PhotoDirector makes it easy to enhance your smile in photos, even if you do not have much editing experience.
With PhotoDirector, you can use a small brush to apply a white filter to your teeth, making them appear brighter. Create a natural-looking white smile with a few simple steps.
PhotoDirector is free to download, allowing you to try out its features without a monetary commitment.
If you want to learn more about perfecting your photos, check out our Ultimate Guide to Photo Retouching. If you want to preview post-aesthetic treatment results for multiple areas risk-free, be sure to explore our Ultimate Guide to Cosmetic Treatment AI Simulation.
Teeth Whitening Photo Editor FAQs
If you're looking to download teeth whitening software, you'll want to ensure it has the right features to whiten the teeth in your photo and apply other high-level edits. We recommend looking for an app with beauty touch up tools and the following features at a minimum:
- Crop, resize, and adjustment tools
- AI-powered effects
- Animation effects
- Video-to-photo features
- Photo filters
- Frames and watermarks
- Object removal tools
All of these features and a lot more can be found in PhotoDirector.
If your teeth tend to look yellow in photos, you may wonder if it's essential to whiten them in post-production. Of course, the decision is up to you. However, having whiter teeth or portraying white teeth in photos has numerous benefits, such as:
- Making you seem friendlier: Your smile can show your personality to others before you have a chance to speak with them. If you want to appear friendly in your photos, whitening your teeth can make you seem more approachable, leading people to want to be your friend.
- Improving your appearance: Having white teeth can also make you look more attractive. If you’re trying to enhance your appearance in a photo, whitening your teeth is an easy way to do so without drastically changing any of your qualities.
- Minimizing the look of wrinkles: Bright, white teeth can draw your followers’ attention away from any wrinkles or blemishes around your mouth, making them less noticeable.
- Boosting your confidence: Whitening your teeth in photos can also increase your confidence in real life. Often, posting a picture of yourself in which you look attractive can make you feel more confident in your appearance.
Overall, image teeth whitening is an effective way to improve your photos and make you feel more attractive.
If you want to add more professional effects to your photos, you may want to edit pictures on your laptop or desktop computer instead of your phone. Editing on your computer can give you more control over your changes and allow you to view your images on a larger screen, enabling more precision and fine-tuning.
If you prefer to edit photos on your computer, you should download a professional-level editing program suitable for your image-editing needs. The best editing programs allow you to achieve more than just image teeth whitening yet use simple, easy-to-navigate interfaces that anyone can quickly learn.
Here are our top five programs for photo editing on Windows and Mac:
- PhotoDirector
- Photoshop
- Lightroom
- Paintshop Pro
- DxO PhotoLab
For an in-depth look at each, check out The 5 Best Photo Editing Software for 2022.


![AI Face Swap Online for Photos – Best Free Websites [2025]](https://dl-file.cyberlink.com/web/content/b3113/Thumbnail.jpg)