How to Edit Photos on Mac Like a Pro

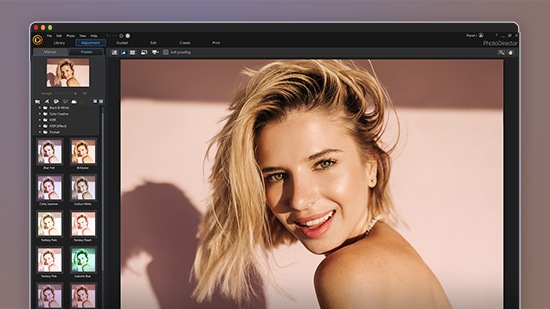
It can take hours and countless attempts to get the right picture — and even then, it still needs at least a few tweaks before it’s just right. Sometimes you take a picture, and everything is perfect except for a tiny detail. But if you have a tool that enables you to make edits, you can snap away without having to worry about whether you get things just right.
The key is understanding how to use the tool in various situations. If you have a Mac, this guide will help you understand how to edit photos like a pro, performing basic and detailed adjustments to your pictures. Here, you will learn how to crop, rotate, resize, adjust color and detail, as well as remove unwanted elements from photographs on a Mac.
We will use PhotoDirector to show how to do this because it is the best video editor for pros to beginners.
- How to Choose a Photo Editor for Mac
- Best Photo Editing Software for Mac
- How to Edit Photos on Mac
- Download the Best Software to Edit Photos on Mac for Free
- How to Edit Photos on Mac FAQ
How to Choose a Photo Editor for Mac
The key to choosing a good photo editing software for Mac is to select one that works well with the Mac workflow. So, naturally, the app also has to be compatible with Macs. In addition, because a Mac has so many powerful processing features, you want a photo editing program that can take advantage of your computer’s computational power. For this guide, we’ll use PhotoDirector, which has a full-featured, in-depth editing program that’s an excellent fit for a Mac.
Best Photo Editing Software for Mac

PhotoDirector
PhotoDirector is the best photo editing software for Mac and is preferable to Luminar Neo and other options on the market. Even though several programs enable you to crop photos and adjust their colors, PhotoDirector’s tools are unparalleled. You can adjust nearly any element of a photograph, changing it to whatever your imagination decides. This includes replacing skies, shifting focus, and transforming a photo into a cartoon or even an animated video.
How to Edit Photos on Mac
Here are some of the most common and useful photo editing features you can do on a Mac with PhotoDirector.
Crop
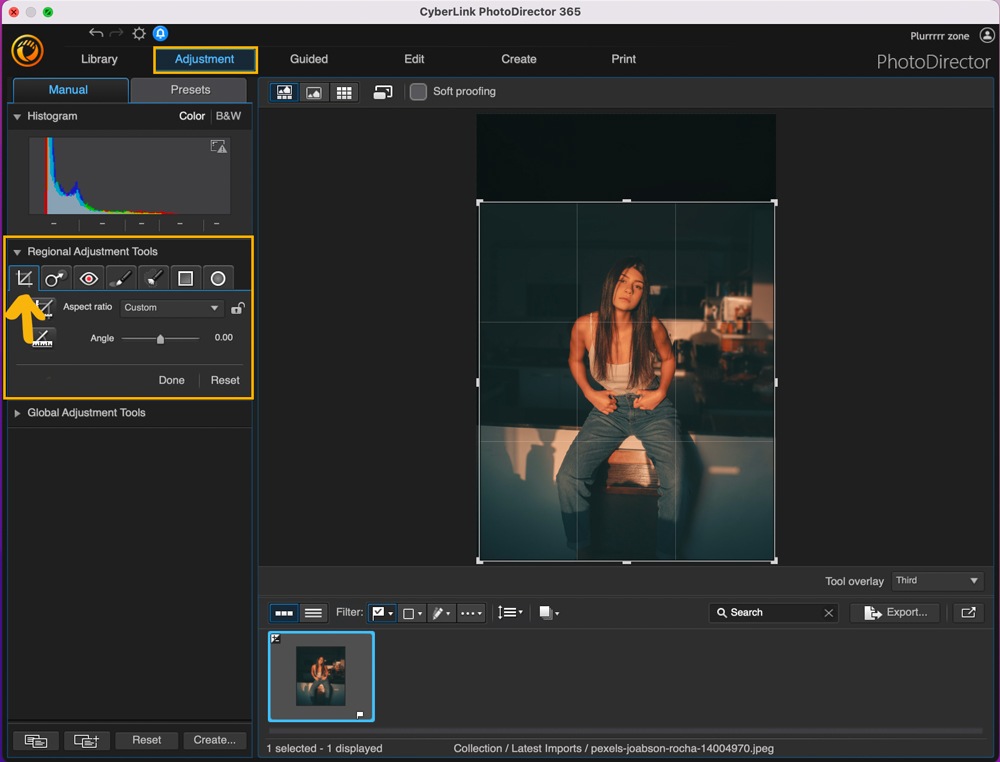
Cropping on PhotoDirector is straightforward. All you have to do is:
- Choose an image you’d like to work with and open the Adjustment tab.
- Choose the Crop icon under Regional Adjustment Tools.
- Adjust the size of the rectangle surrounding the image by pulling in the tabs at the corners or edges. You can also make the rectangle a certain size and then click and drag it to the position you want so it crops the right section of your photo.
Rotate
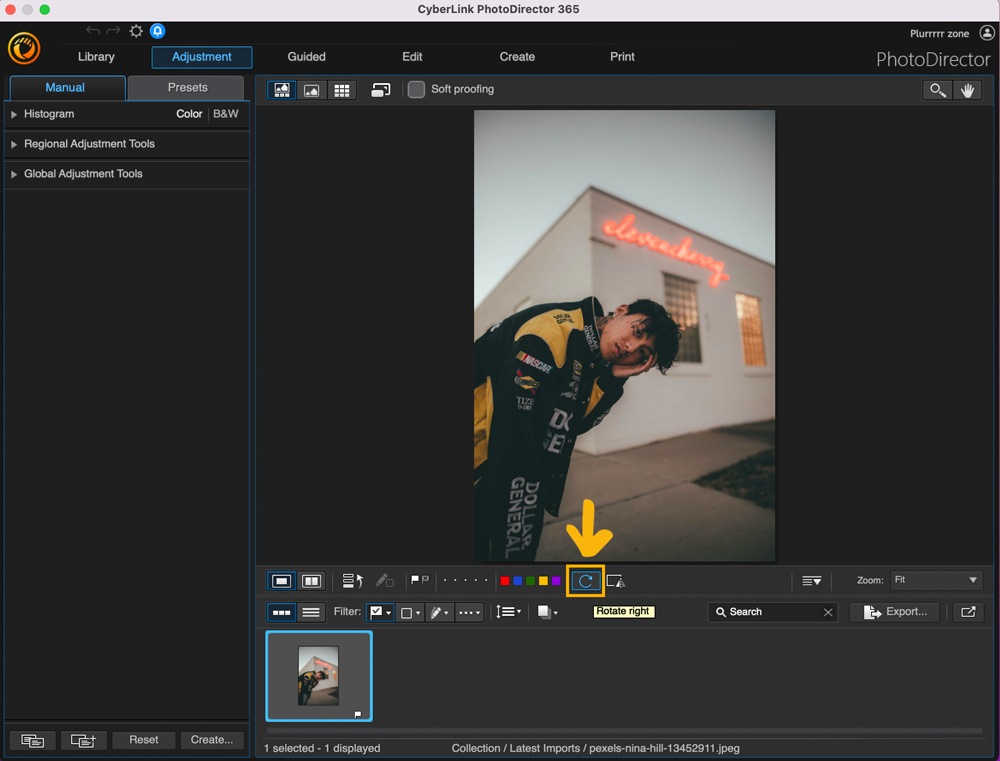
Rotating a photo in PhotoDirector is also very simple. Here are the steps:
- After selecting the photo, you want to work with open the Adjustment tab.
- Click the Rotate icon directly below the image preview. Each time you click it, the image will rotate 90° clockwise.
- To flip the image, you click the icon to the right of Rotate. When you do this, you get a mirror image of the photo.
Resize
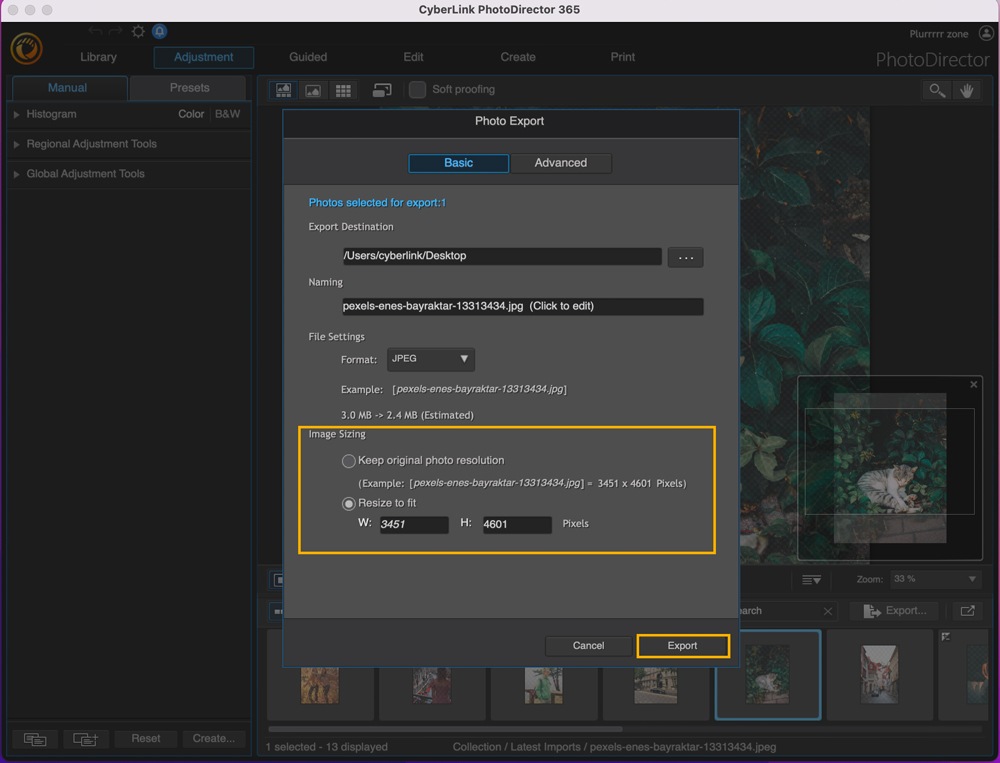
To resize photos on your Mac with PhotoDirector, you simply have to:
- With your image selected open the File menu and select Export Selected Photos.
- Resize your photo by adjusting the Image Sizing settings.
- Click Export to save your resized image.
Adjust Brightness and Saturation
To adjust brightness, similar to some of the other photo adjustments, you have to do the following to enhance your photo:
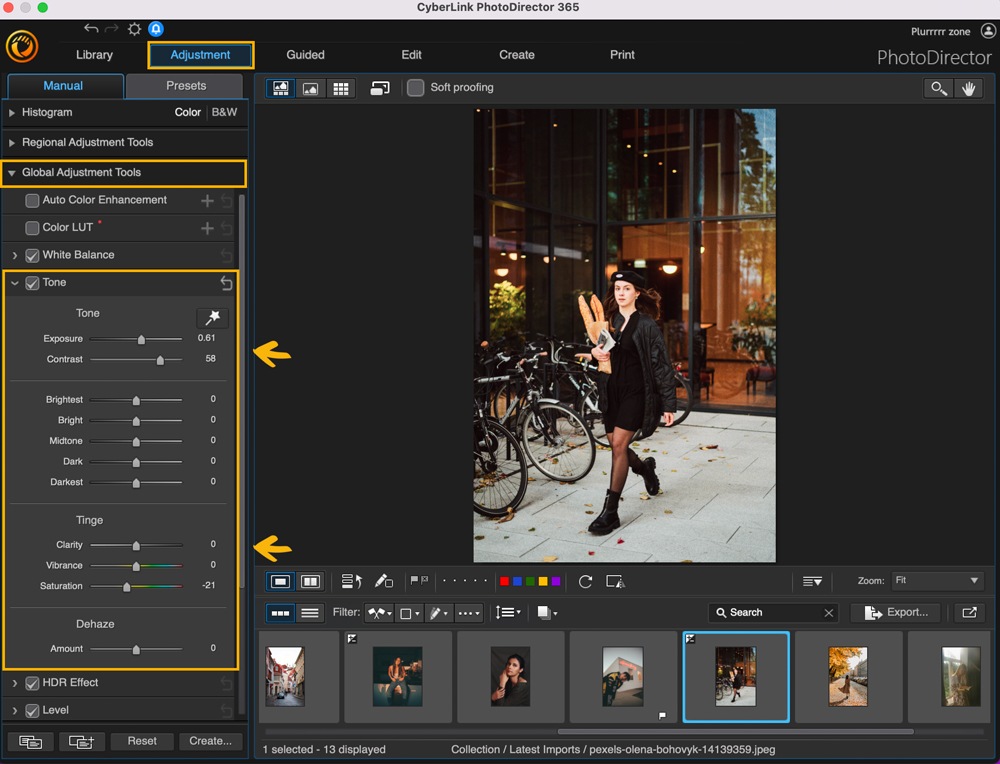
- Under the Adjustment tab open Tone.
- Here you can adjust Exposure, Contrast, and Saturation as well as the overall brightness of your image.
White Balance
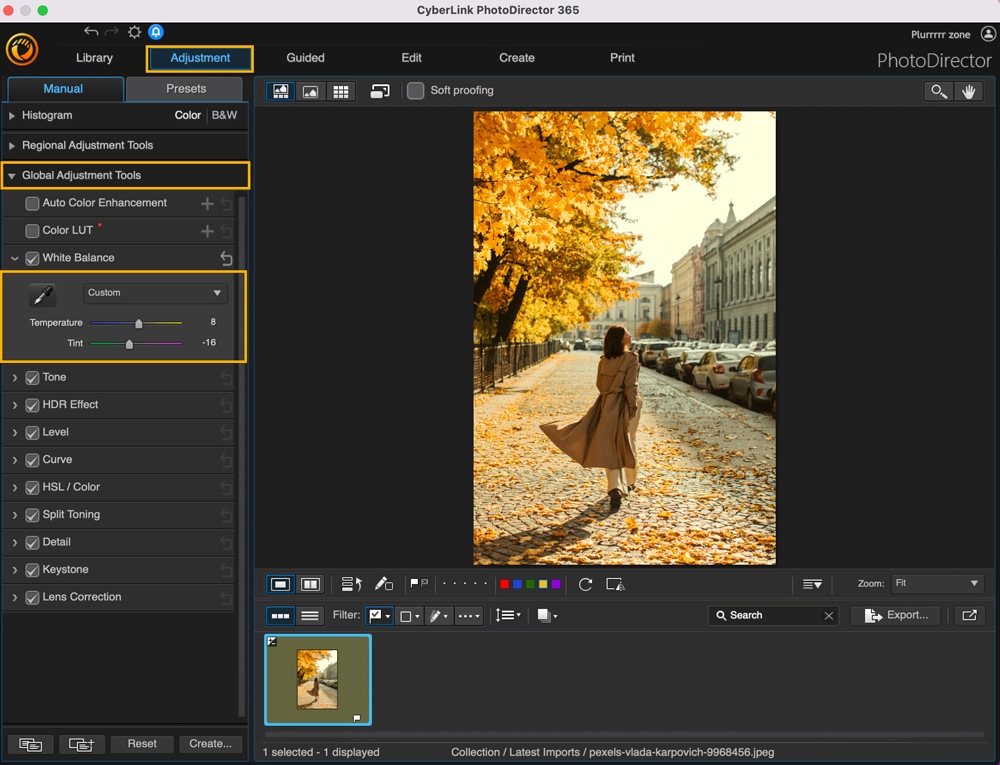
PhotoDirector for Mac also has an adjust filter to let you edit white balance using Temperature and Tint settings.
- Under the Adjustment tab open White Balance.
- You can Auto white balance, adjust the Temperature and Tint of the shot, or use the eye dropper to choose a white source to adjust your photos white balance.
Sharpness
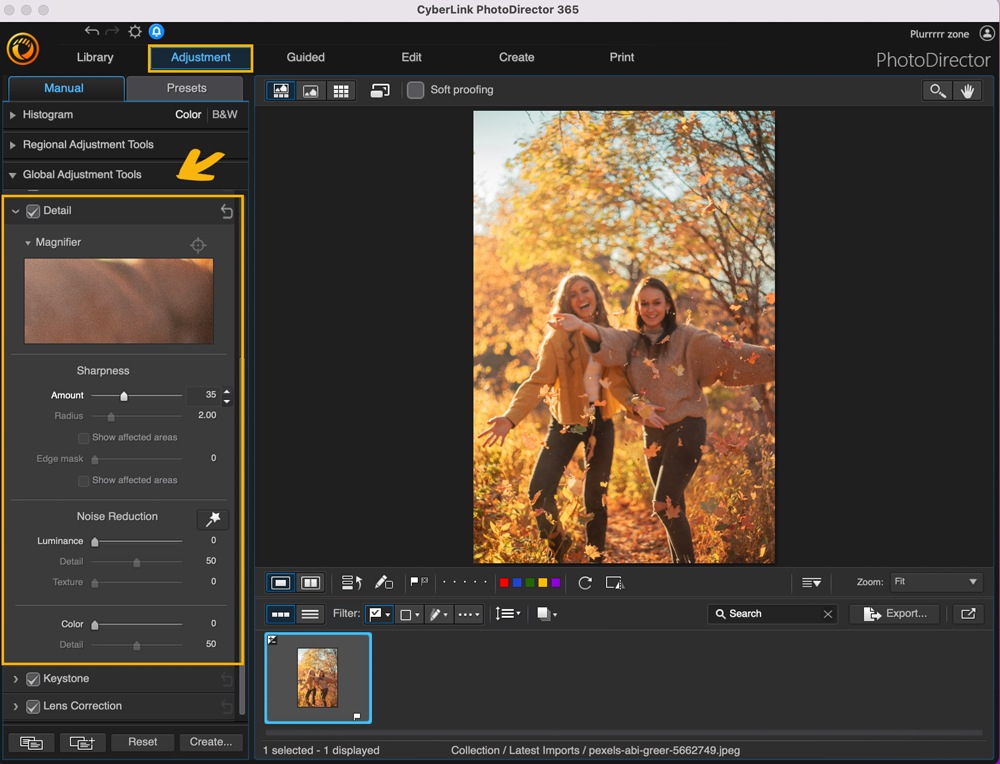
Adjusting the sharpness in PhotoDirector can be done under the Adjustment tab and Guided tab.
- Under the Adjustment tab open Detail.
- Here you can sharpen your image.
- If you need to fix a blurry image open the Guided tab.
- Under the Improve/Remove drop down menu open Deblur.
- Click Apply and adjust the amount of deblur that is applied.
Remove Redeye
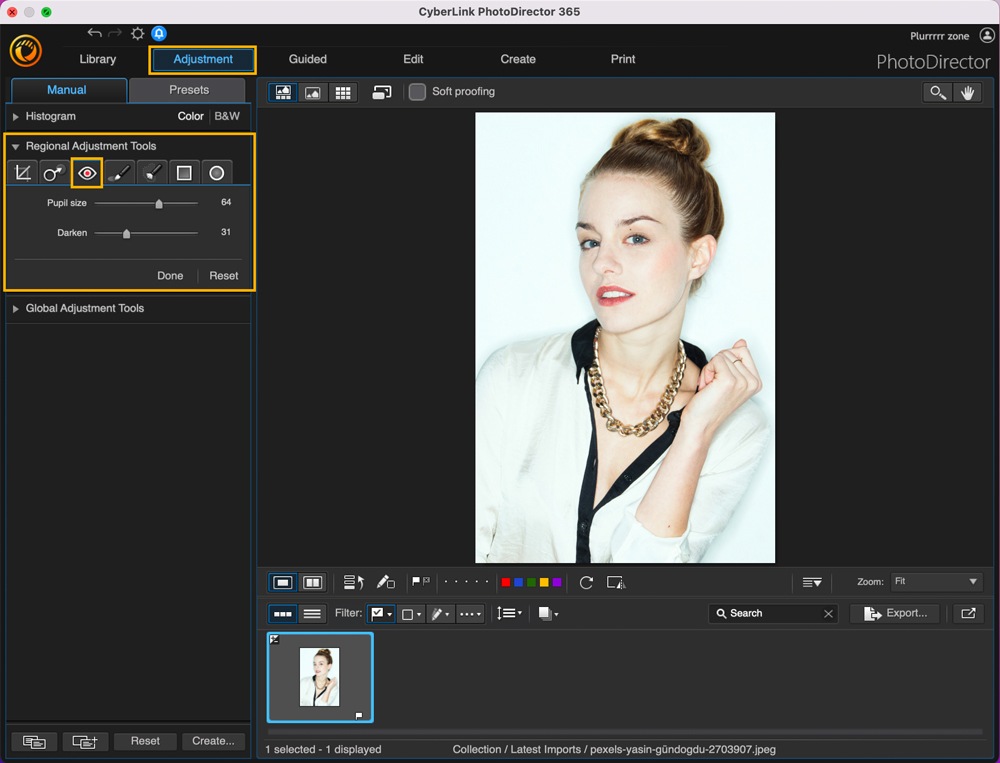
Redeye can snatch the feeling right out of an otherwise great photo. Here’s how to get rid of it from your original photo:
- Open the image in the Adjustment tab.
- Choose the Red Eye icon under Regional Adjustment Tools.
- With your cursor, select the eyes affected, and the redness will be removed.
Reduce Noise
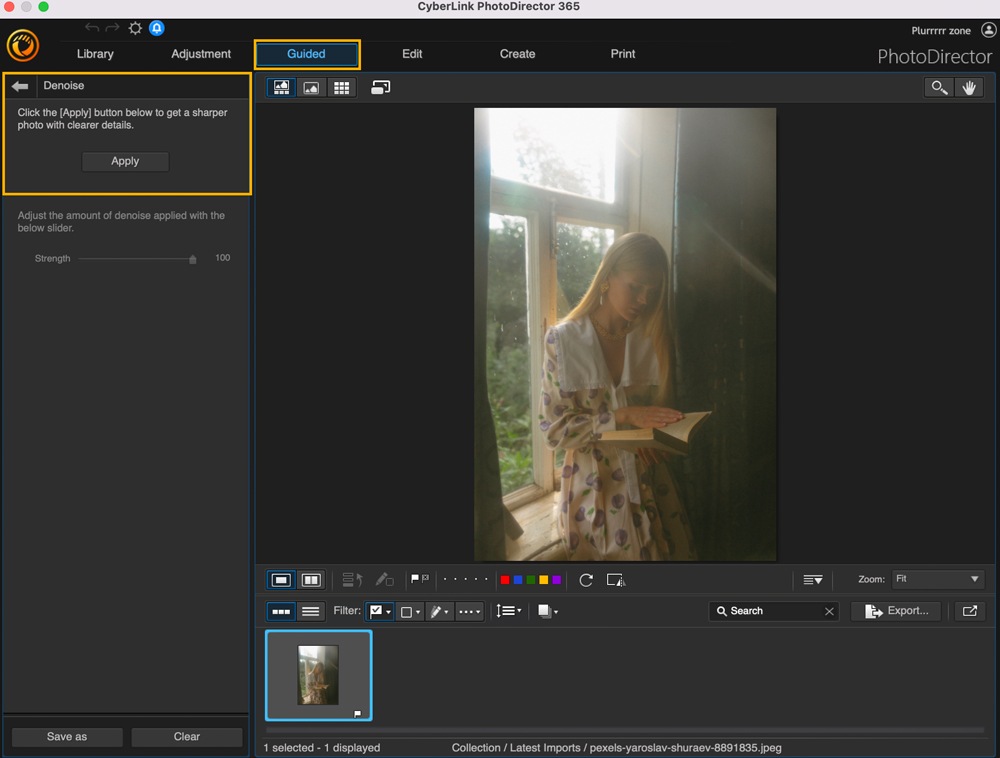
Noise reduction is simple in PhotoDirector because it has a specific setting designed especially to eliminate the noise in your image in the photos you work with. Here’s how to use it:
- Open an image in the Guided tab.
- Then select Improve/Remove.
- Click Denoise, then Apply. The noise gets automatically removed from the image and you can adjust the amount it is applied.
Use Filters (Presets)
PhotoDirector for Mac has a section dedicated to presets, so you can easily apply them to any of your images. You have many options, such as using a black-and-white preset or other Photoshop alternatives. Here’s how to use presets:
- In the Adjustment tab, next to the Manual tab, you will find the Preset tab. Click this to reveal your choices.
- Decide which category of presets you want to work with, such as Black and White, Color Creative, HDR, HDR (Effect), or Portrait.
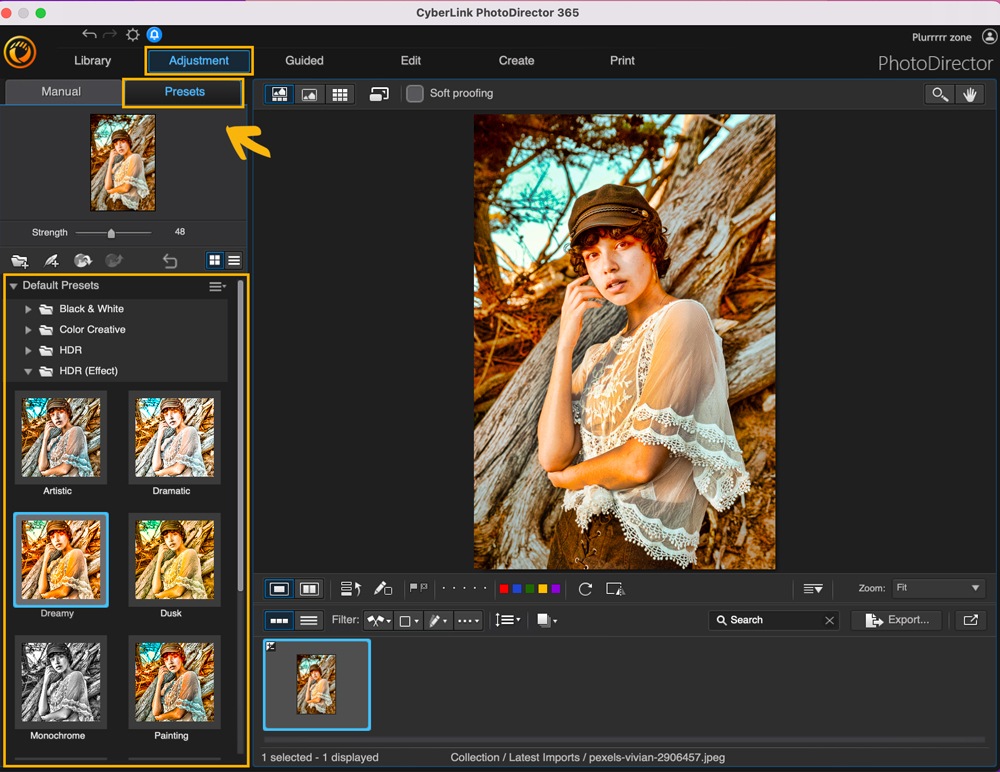
- As you choose different presets, you get a preview of how they will look on your image. Keep going through them until you see an effect you like.
Make Black and White
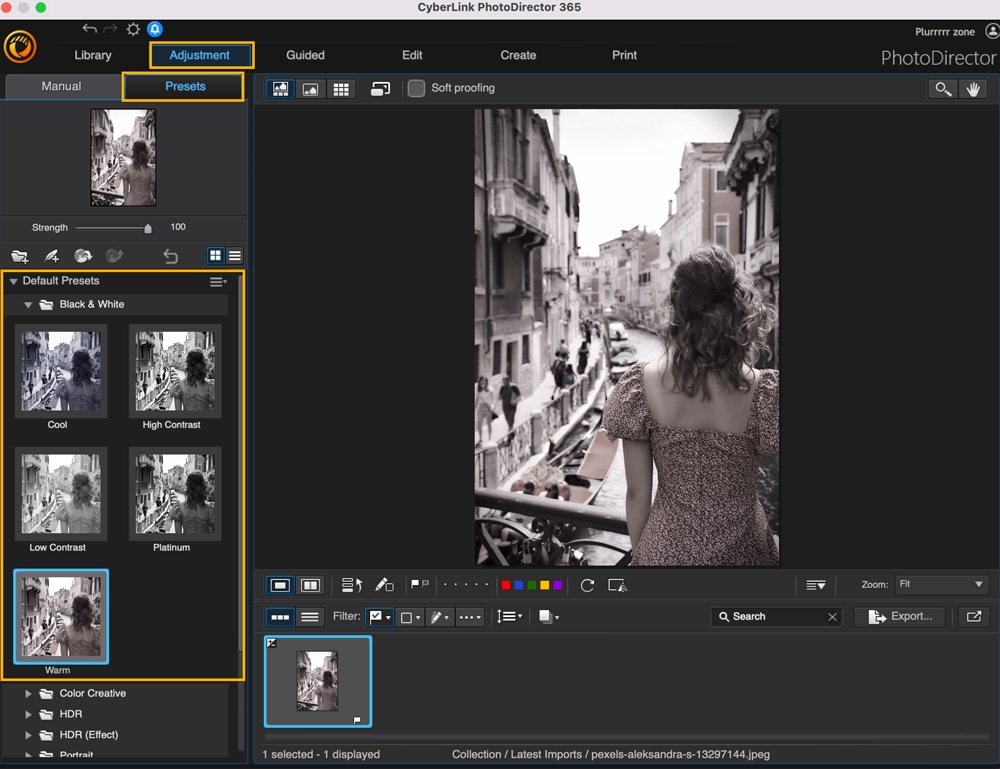
The Black & White preset in PhotoDirector is your best bet for taking the color out of an image on a Mac. Here’s how to use it:
- Choose an image, then click the Presets tab on the left of the screen, then Default Presets.
- Select Black & White, then choose from Cool, High Contrast, Low Contrast, Platinum, or Warm.
Touch-ups (People Beautifiers)
PhotoDirector’s People Beautifier is one of the most convenient photo editing features if you have a Mac, and it’s simple to use:
- After selecting a photo, open the Guided tab.
- Select People Beautifier, then one of the following selections: Face Tools, Skin Tools, or Body Shaper.
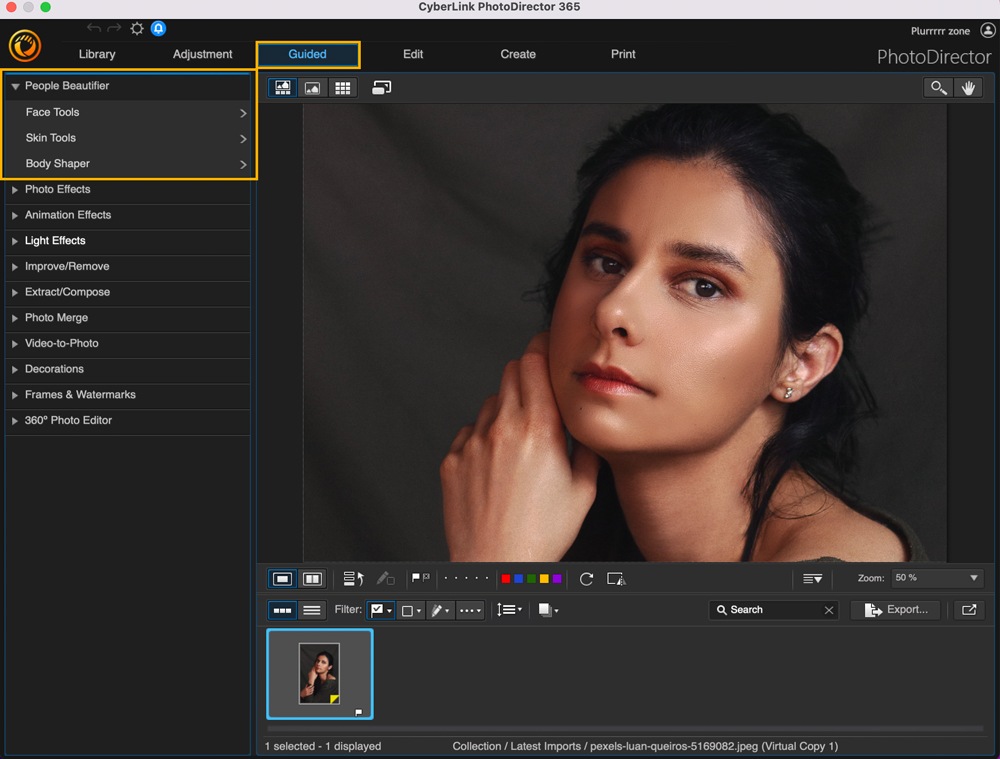
- Follow the instruction in the tool to touch-up your photo.
Object Removal
To perform object removal on a Mac, you can use PhotoDirector’s Improve/Remove feature. Here are the steps:
- After choosing an image, open it in Guided.
- Select Improve/Remove, then Smart Patch.
- Choose the area you want to remove using the tool, then click Next.
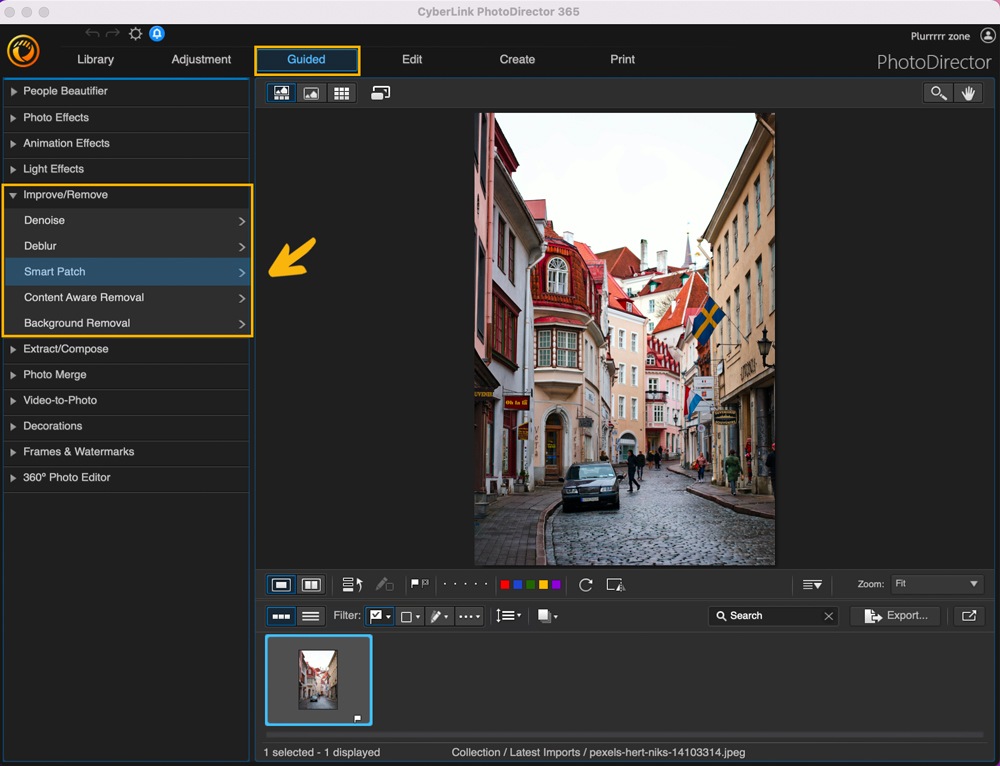
- Keep choosing the sections you want to remove until they’re all gone. PhotoDirector automatically replaces the section you’re removing using elements of the image around it.
Replace Background
To replace our background on a Mac, you can use PhotoDirector’s Improve/Remove function and two images. Here’s how to do it in the Edit tab:
- Select the image you want to remove the background from and the one you want to use to put in place of the background.
- Make sure the image whose background you want to change is listed as number 1, and the image you want to use as the new background is number 2.
- Select the magic wand tool, then Background Removal.
- Use the Brush to select the area in the first image you want to replace with a different background. If you’ve selected Intelligent, PhotoDirector automatically detects the edges in your image.
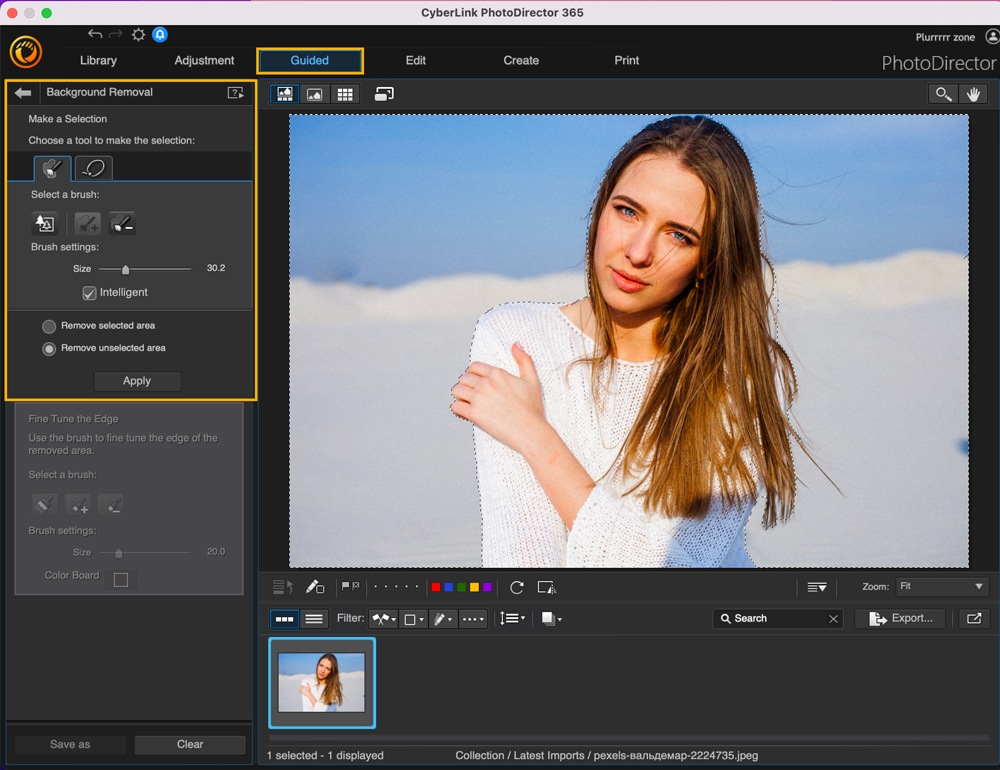
- After you’ve selected the appropriate area to remove, click Apply, and PhotoDirector takes out that selection, replacing it with the second image behind it. You can also keep what you select and take everything else out.
Download the Best Software to Edit Photos on Mac for Free
Many people need to edit their photos to enhance a project's creativity or remove unwanted elements. With PhotoDirector, you can make various changes in a few simple steps. Its intelligent features make editing simple and fast, and it has plenty of presets to help get your creative juices flowing quicker.
Download PhotoDirector for Mac today to get started.
How to Edit Photos on Mac FAQ
You can use PhotoDirector because it’s compatible with macOS and has many easy-to-use features.
Macs have a free image editor called Preview, but it’s not explicitly designed for quality photo editing. You can use it to crop photos and remove things around the edges of your images, but because you can’t automatically overlay two images on top of each other, some photo editing features are impossible to execute without many painstaking steps.
Macs have a built-in photo effect creator called Photo Booth, but they don’t have a dedicated photo editor. This means you need an additional app to apply photo-specific effects and filters to make granular edits to your images.
There is no dedicated photo editor on Mac computers.
The easiest photo editor for Mac is PhotoDirector because it has straightforward workflows, AI-powered features, and plenty of presets to help you get started quickly.
The easiest way to edit photos on a Mac without Photoshop is to use PhotoDirector. It has many of the same features as Photoshop, so you can get started with it for free. The end product you get with PhotoDirector can be as good as what you could reach with Photoshop, but you may spend less time making your edits and creating your effects, thanks to a smooth, intuitive workflow.
If you’re new to photo editing, the best software to get started is PhotoDirector. Its workflow is simple and easy to understand, and its presets make editing photos faster than it would be when using other apps.


