How to Use Photo Clipping Masks in 2024 [Windows, Mac]

Photo clipping masks are among the most valuable tools to enhance your workflow as a visual communicator. You can create a clipping mask to constrain an image within a particular shape, add an overlay effect, or establish an area where you can apply effects without moving over the lines. However, clipping and layer masks are relatively complex graphic design tools, especially for beginning image editors.
This article discusses clipping masks and how to use them when working on your projects. Hopefully, following these instructions will help you be more creative when editing photos, designing logos, or creating other image content.
We will use PhotoDirector in our step-by-step instructions for our demonstration, as this software is the best solution for clipping masks.
- What Is a Clipping Mask?
- Best Clipping Mask Software
- How to Use Photo Clipping Masks
- Download the Best Clipping Mask Software for Free
- Photo Clipping Mask FAQ
What Is a Clipping Mask?
A clipping mask is an object, such as a vector shape, that hides certain areas of an artwork layer, changing its appearance.
To understand the concept of a clipping mask, think of your Facebook profile picture. Even though you likely uploaded a square image as your profile picture, it appears as a circle on your profile, and the background of your original image is not entirely visible. This circle is an example of a clipping mask.
Clipping mask editing is part of layer editing. In practice, the clipping mask is the bottom layer, and the artwork is the top layer, which some might find counterintuitive.
For example, suppose you want to recreate our example of the round Facebook profile picture. In that case, you need to overlay a photograph onto a layer consisting of a circle with masking edges. The circle, or clipping mask, should be the base layer, and the image should be the top layer in your layers panel.
Once you apply the clipping mask, your photo will take on the appearance of the base layer, resembling its opacity profile. In this case, your photo will adopt the appearance of the circular shape below it, similar to placing a physical square photo in a picture frame with a round mat opening.
When using professional clipping mask software, you can do much more than make a square image round. For example, you can use intricate shapes or text instead of a circle. Clipping masks also provide a handy method for creating overlay effects.
Text is one of the most popular options for clipping masks. With PhotoDirector, you can let your artwork fill the body of the letters, and you have the option to add additional elements such as a background, text, and images.
Best Clipping Mask Software

PhotoDirector
PhotoDirector is a feature-packed image editor for illustrators, photographers, and social content creators of all experience levels. This software has a robust clipping mask editor that integrates well with other editing tools, including blending modes, text overlays, and border gradients.
Using PhotoDirector, you can upload an image to use as a clipping mask from your local storage. You can also create a mask from a shape or the text tool.
If you are looking for the best clipping mask software, PhotoDirector is your best option.
Download PhotoDirector for free.
How to Use Photo Clipping Masks
Using photo clipping masks is a straightforward process with PhotoDirector. Follow the steps below to create a multi-dimensional image using the software’s clipping mask feature.
- Download PhotoDirector
- Import your images
- Make sure your layer order is correct
- Resize your images
- Apply the clipping mask
- Make final adjustments
- Add additional text
- Change your background
- Save your image
Then install the software by following the installation prompts. PhotoDirector is compatible with Windows and Mac. After installation, launch the software on your computer.
When using the clipping mask feature, you need to import at least two images as new layers: the clipping mask and your artwork image. A vector image works best as a clipping mask, but you can also use a raster image. Your artwork can be any image you want to incorporate into your projects, such as a photograph or stock image.
If you are using the latest version of PhotoDirector, click on the Edit tab at the top of your screen. In previous versions of PhotoDirector, you will find the layer editing tools under the Layers tab.
Click on Add new layer to create the first component of your image. From this drop-down menu, select Add Photo, then From Folder.

Select the image you want to use as a clipping mask from your computer’s local storage. Ideally, your clipping mask should be in PNG format, as this type of file stores the opacity setting for each pixel.
Next, you can import the artwork you want to pin to your clipping mask. Click on Add new layer, then import your artwork from your local storage.
In the layers panel to the left of the preview screen, you will see the images you added to your project.
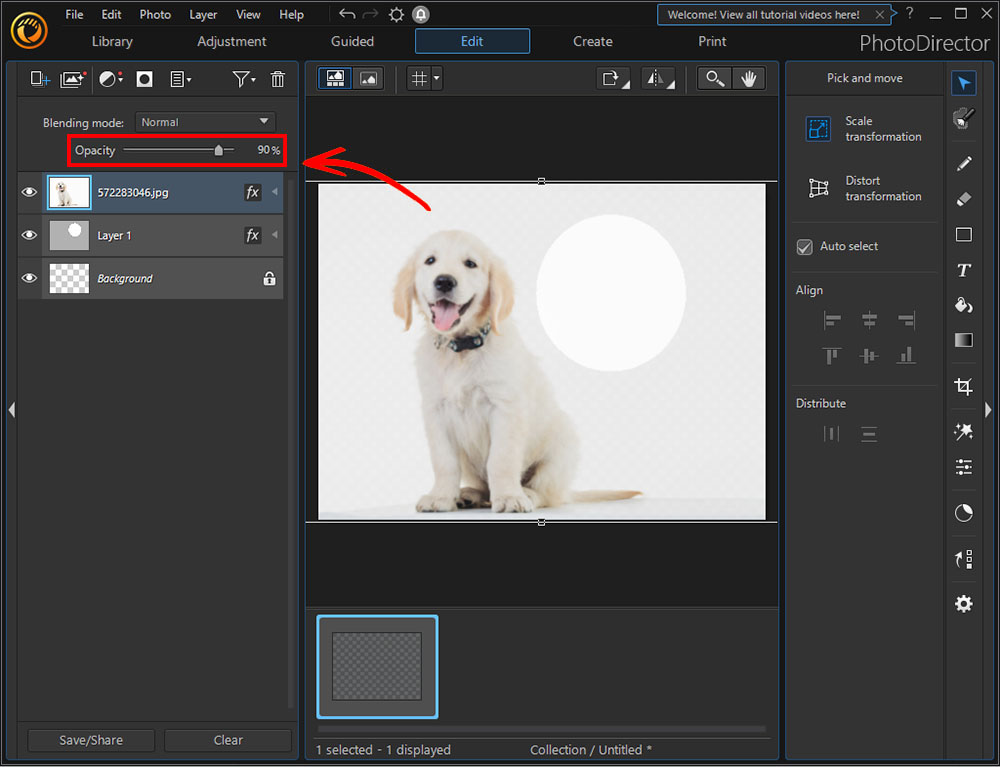
After importing your images, your clipping mask layer should be below the artwork. Your artwork should also cover the clipping mask in the preview screen. In other words, after importing your images and before starting the editing process, you should not be able to see the clipping mask in the preview screen.
If your clipping mask is above the artwork, drag the clipping mask layer’s thumbnail down in the layers panel. The clipping mask should be directly below the artwork that clips to it, and you can add layers above or below these two images.
Aligning your images with each other is critical to ensure that the clipping mask’s compound path doesn’t hide essential elements in your artwork layer. Starting from the top, adjust the size of each selected layer using the resizing and repositioning nodes in the preview screen.
To see the clipping mask below your artwork layer, adjust this top layer’s opacity using the adjustment slide above the layers panel. After adjusting each layer’s size and position, you can drag the Opacity slider back to 100%.

When resizing your layers, you should only worry about the areas where the artwork and opaque elements of the clipping mask layer overlap. Your artwork will not be visible outside the clipping art’s opaque areas, which means these layers’ outer borders don’t need to be in alignment.
You are now ready to apply the clipping mask, merging the two layers into one image.
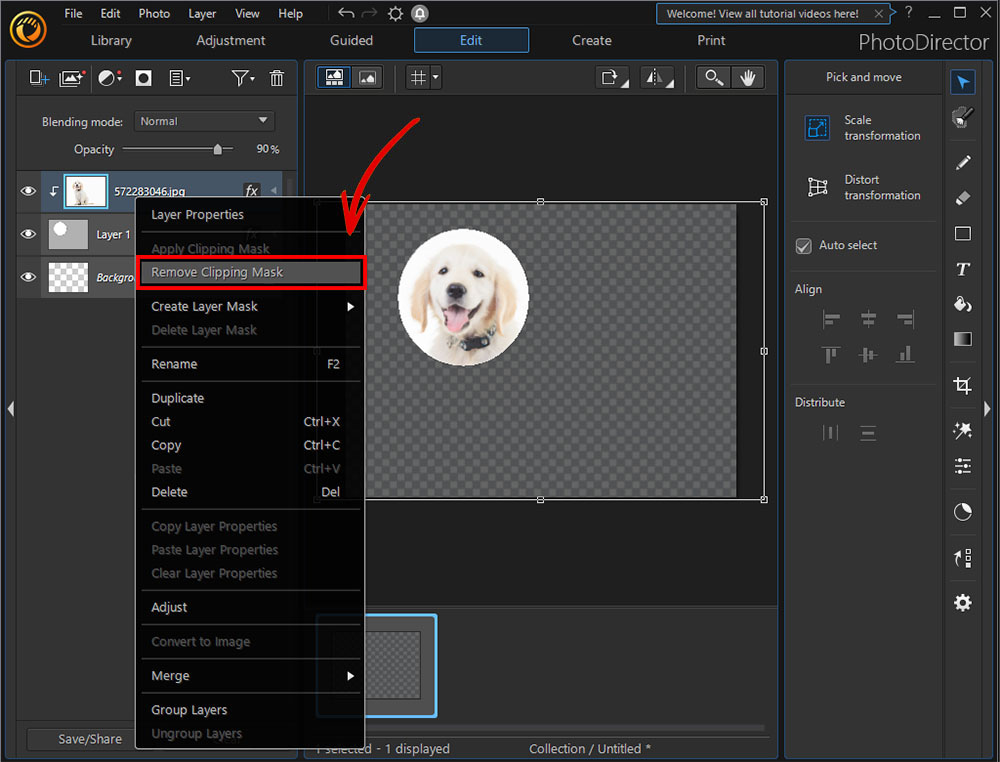
Right-click on your artwork layer in the layers panel, then click on Apply Clipping Mask in the drop-down menu. Alternatively, double-click on the clipping mask icon above the Blending Mode drop-down menu.

Once you apply the clipping mask, your artwork will take the shape of the clipping mask’s opaque profile.
For example, where the clipping mask has an opacity of 5%, your artwork will also have an opacity of 5%. Where the clipping mask is fully opaque, your artwork’s pixels will have no transparency. In the layers panel, the clipping mask thumbnail will have a black-and-white check pattern wherever the image is transparent.
Once you apply the clipping mask, a downward-facing arrow will appear next to the artwork’s thumbnail. If you want to undo the application, you can right-click on the artwork layer and select Remove Clipping Mask.

After applying the clipping mask, you still have the option to reposition or resize the artwork image so that it meets your project requirements. Select the Pick and Move tool in the top right corner of your screen, then click on the artwork layer in the layers panel. You can now move the artwork image to where you want it to be relative to the clipping mask.
You can add filling text or any other element to complete your image. Click on Add new layer in the top left corner of your screen, then select Add Empty Layer. The new transparent layer thumbnail will appear on the layers panel with a black and white check pattern.

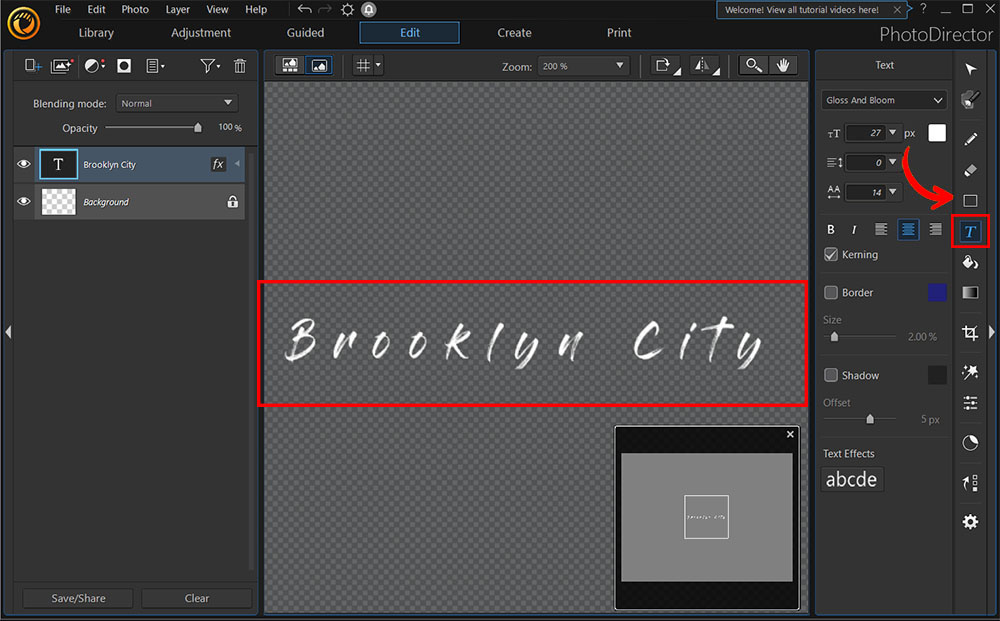
Select the text tool from the right-hand vertical toolbar, then use the Text window to adjust the new text’s font properties. With the Text tool open, click on any place in the preview window where you want to add the text, then enter the text into the Input bar. Click OK to apply the text to your image.
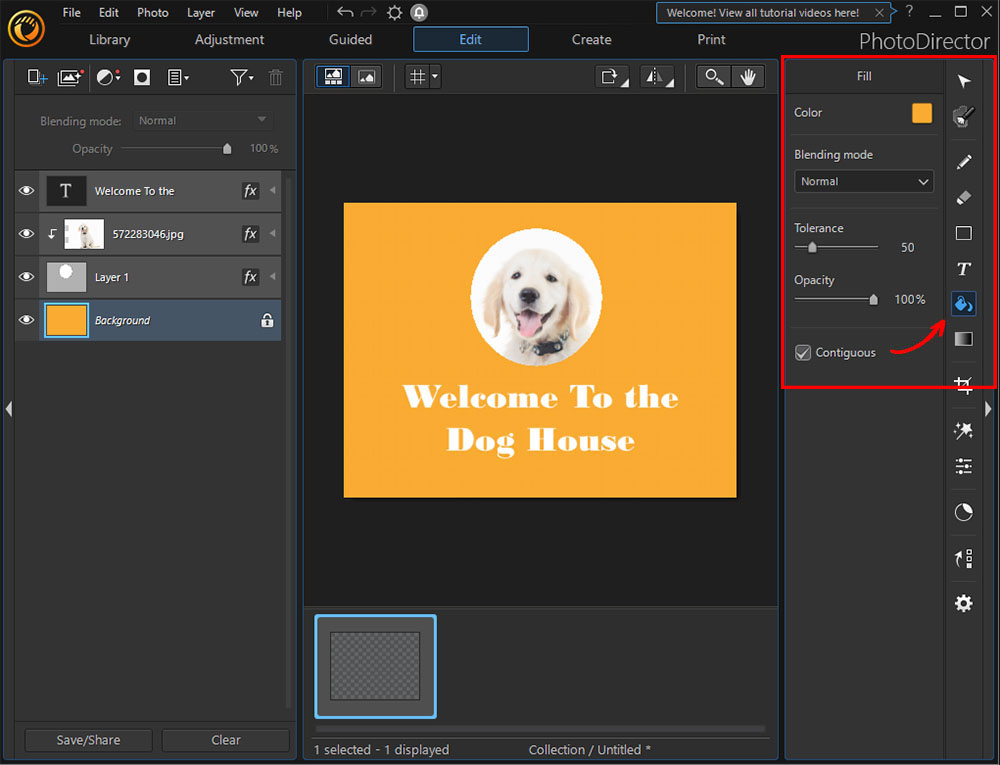
Your image might still have a transparent background after applying a clipping mask. To fill this area, select the Background layer in the layers panel, then select the Fill tool from the right-hand vertical toolbar.

In the Fill window, you can select your background Color, Tolerance, and Opacity. You can also apply a blending mode to create a unique transition between the background and the artwork, which now has the shape of the clipping mask. Complete this process by clicking on the background and applying the color.
After adding your background, you can save your image to your computer’s local storage. From the File drop-down menu, you can choose to save the image or share it directly to an online platform.
Creating a Photo Clipping Mask Using the Text Editor
With PhotoDirector, you can use text as the clipping mask. With this process, you don’t need to upload a vector image, and you can create the mask using the text tool.
- Launch PhotoDirector on your computer.
- Add a text-clipping mask.
- Add the artwork for filling your text.
- Apply the clipping mask.
Click on the Edit tab to open PhotoDirector’s layer editing tab. Click on Add new layer, then select Add Empty Layer from the drop-down menu.
Select the Text tool from the vertical toolbar, then add a text box to the preview screen. Enter the text you want to use as a clipping mask.

Import the artwork you want to pin to your clipping mask. Click on Add new layer, then import your artwork from your local storage. The artwork will appear above your clipping mask text.

Right-click on your artwork layer in the layers panel, then select Apply Clipping Mask. Your artwork image will fill the clipping mask letters.
Download the Best Clipping Mask Software for Free
Applying clipping masks can be challenging if your photo editing software doesn’t provide optimal editability or if the tool is complex. However, with PhotoDirector, applying a clipping mask to images is a straightforward process, and you can edit your image to meet all your project goals.
Download PhotoDirector for free.
Photo Clipping Mask FAQ
1. What Features Should I Look for in Clipping Mask Software?
- Operating system compatibility
- Layer-editing capability
- Blending-modes application
- Overlay-effects editing
- Clipping-mask creation and editing
If you’re looking for a product that checks all of these boxes, we recommend PhotoDirector.
2. What Is the Benefit of Using a Clipping Mask?
Clipping masks work well to confine an artwork or other image to a specific shape or area. Whether you want to personalize image text or create a unique subject profile, clipping mask editing is the skill to learn.
3. What Other Photo Layer Editing Techniques Should I Know?
Essential layer-editing techniques to understand and use include:
- Removing backgrounds and other elements
- Adding text and graphic images
- Blending layers
- Adjusting layer properties
- Merging images
PhotoDirector is among the leading image-editing software with professional features such as layer editing, extensive effects libraries, and blending modes. You can also add and edit animations and share your content directly on social media.

