

How to Add Curved Text to Images [Windows & Mac]

Using curved text in your projects can effectively make aspects of your content stand out. For example, you can use the curved text option to create a heading or logo. Curved text can also be an element of an image or video that you add to social media to make your content more engaging or convey a specific message. However, creating a professional-looking curved text element can be challenging, especially without a proper graphic design tool.
This guide provides a step-by-step guide you can follow to create curved or circular text effects. If you want to create eye-catching arched text, follow these instructions. The workflows we describe below are suitable for both Windows and Mac users.
For our demonstration, we will be using PhotoDirector, the best solution for creating curved text in images.
- What Are Different Ways to Use Curved Text?
- Best Software to Curve Text in Images
- How to Add Curved Text to Images
- Download the Best Curved Text Software for Free
- Curved Text FAQ
What Are Different Ways to Use Curved Text?
Adding curved text as a whole or partial circle is a great way to turn your text into an engaging visual element that draws the attention of your reader, viewer, or follower. One of the most popular ways to use a curved text tool is to fit the text around a circle so that the letters are upright at the top and upside down at the bottom.
You can also turn your headings into arcs turning upward at the end. This smile shape has a subliminal effect on readers, and they should be more likely to regard your content in a positive light.
Curving your text around an icon is another way to leverage this graphic design skill. You can add two text semicircles at the top and bottom of a logo or curve text in a wavelike pattern, significantly impacting a brand’s identity.
Best Software to Curve Text in Images
PhotoDirector
PhotoDirector is the best tool for creating curved or circular text for images. This program provides a comprehensive text editor with non-destructive layering and gives you all the professional editing tools you need to enhance your text elements to perfection. These tools include blending modes, kerning, and an extensive range of text element adjustments.
PhotoDirector is easy to use, even if you are new to graphic design tools. When using this intuitive editing program, you won’t need to spend valuable time learning the various aspects of text editing.
Download PhotoDirector for free.
How to Add Curved Text to Images
Adding curved text to images is a relatively quick and straightforward process using PhotoDirector. Follow the steps below to create and add a text box as a visual element to your image.
- Download and install PhotoDirector on your computer.
The software is compatible with Windows and Mac.
- Launch PhotoDirector and import your images.
After downloading and installing PhotoDirector, the next step is launching the software on your computer and importing the image that needs text.
To import an image, click on Library in the top-right corner of your screen. Next, click on Import, opening a drop-down menu. Select Photos to open your local storage directory.
Select the image you want to import, then click Open. Finally, click on Import in the image importing window to complete the process. The image you want to edit will appear in your PhotoDirector Media Library.
- Open the layer editing tool.
You must now add curved text as a new layer to your image. In past PhotoDirector versions, this feature was available under the Layers tab. However, layer editing is under the Edit tab in the latest versions. Click on the Edit tab to start the text editing process.
- Open the Text tool.
In the Edit tab, the vertical toolbar appearing to the right of your screen features the Text tool. Open this tool by clicking the T icon (sixth from the top). When you click on the Text tool icon, a window will appear featuring all the editing features you need.
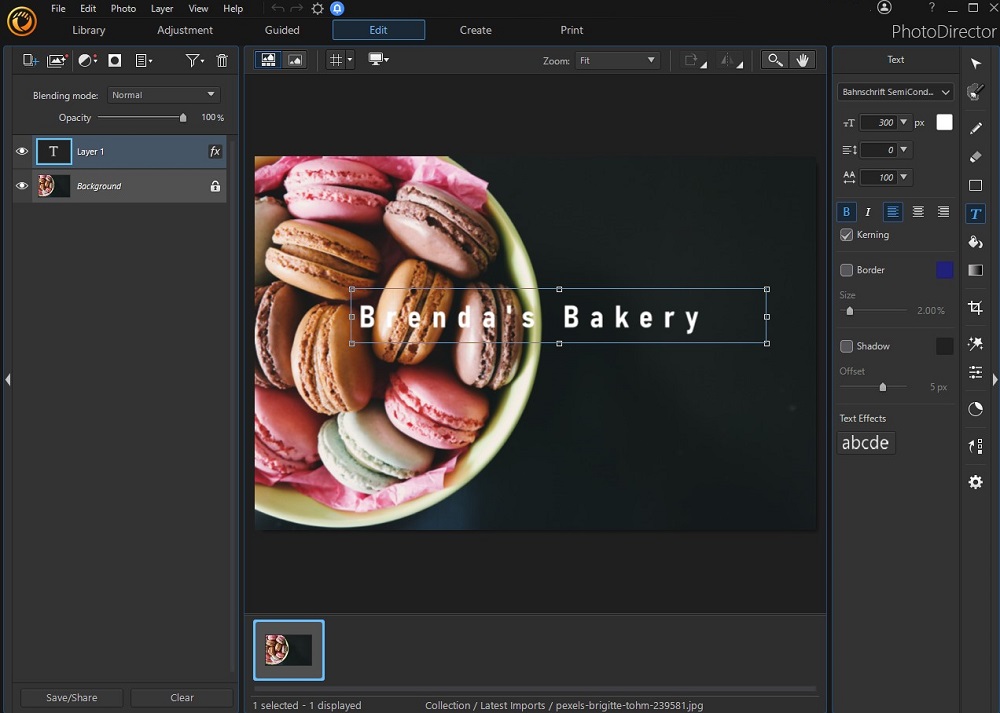
- Add text to your image.
Click on your image and type your text.
- Edit your text element.
With your text selected, choose a Text Effect with the style of curve you want to apply.
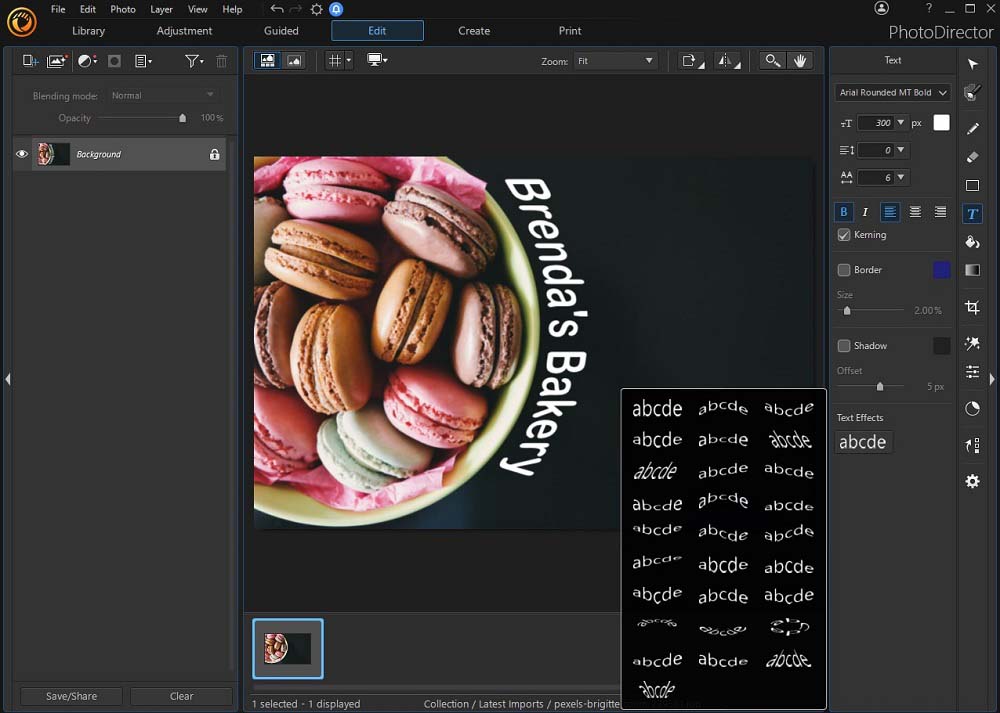
Using the Text tool, you can also adjust the size of your text and the vertical and horizontal spaces between your letters. You can also apply Kerning, which adjusts the spaces between the letters of a word, improving the appearance of your text element. This tool also lets you add a shadow or border.
- Complete and save your project.
After adding and editing your curved text, you still have two separate layers to merge. Click on Edit, then select Merge All. Your image with the text will appear as one thumbnail in the layer editing window. Click on File and save the image to your local storage or share it directly on social media.


Download the Best Curved Text Software for Free
Using a professional tool like PhotoDirector gives you all the editing capabilities to create engaging text elements. This software strikes the perfect balance between editing capability and usability, which means you don’t need to spend hours learning how this software works. Even though this software has a simplistic interface, it offers all the professional-level editing tools for graphic designers and other professional content creators.
You can create almost anything thanks to its layer editing features, professional effects libraries, and animation tools. You also get access to AI tools, such as sky replacements. So whether you need to enhance colors, fix mistakes, or create unique lighting effects, PhotoDirector is the best free editing software.
Download PhotoDirector for free.
Curved Text FAQ
- Compatibility with your operating system
- A straightforward video editing software
- A professional text editing tool
- Professional photo editing features
- Direct social media uploading
PhotoDirector offers all these features and so much more.
If you want to add curved text to a document, consider using Microsoft Word’s Text Effects and Text Box. These tools are relatively easy to use and ensure compatibility with the rest of your content.
- Open the Text Box tool.
Open the Insert tab and select Text Box. If you choose Simple Text Box, the box will appear in your Word document.
- Enter the text you want to curve.
Click on the text box in your document, then delete the sample text appearing in the field. Add the text you want to give a curved appearance.
- Remove the text box border.
Select the box border and right-click, opening the drop-down menu. Select Format Shape at the bottom of this menu, opening the sidebar.
Check the No fill and No line boxes, then close the sidecar. The border around the text box should be gone.
- Curve the text.
Click on the text and select Shape Format at the top of your screen. Open the Text Effects drop-down menu.
Move your mouse cursor to the Transform option, opening a side menu of text effects. Here, you have several options under the Follow Path and Warp sections.
When you click on any of these options, the text effect will apply to the content in the text box. Use the additional settings under Shape Format to adjust the curve and make other changes.
Do you want to curve text in a PowerPoint slide? Follow the instructions below to create visually engaging curved headers or other text elements.
- Open a new or existing PowerPoint presentation and select the slide where you want to add the curved text.
- Insert a new Text Box.
Click on the Inset tab at the top of your screen. Select where you want the text box to appear, then click on Text Box.
- Edit your text box.
Click on the text box to highlight the sample text. Delete the sample, then add the text that you want to curve.
Next, right-click on the text box border and select Format Shape. In this window, check the No fill and No line boxes.
- Curve the text using Text Effects.
After editing your text box, use the Text Effects drop-down menu to select a curved or circular text format.
- Alternative method: Use WordArt.
Instead of creating text using the Text Box in PowerPoint, you can use WordArt. The WordArt tool offers a wide range of formatting options, and you can apply the Text Effects tool to your text to adjust its curvature.


