

How to Merge Photos Together [Windows, Mac]
The ability to create compelling and unique pictures requires various editing skills, with photo merging being among the most critical. By combining images, you can create artistic or special effects, restore errors, and improve the quality of your original images. However, while merging images provides you with unparalleled photo editing freedom, you need to spend time learning this skill, especially if you are new to content creation.
Various methods exist for combining photos, and learning all of them will provide you with a comprehensive skill set you can apply to your projects. This guide provides step-by-step instructions you can follow to merge photos for your projects. Whether you are a photographer, social media influencer, or marketer, this article will hopefully provide you with all the insights you need to create professional and unique images.
We use PhotoDirector in our step-by-step guide as this is the best solution to combine photos with blend modes or create a panorama from multiple image files.
- What Is Photo Merging?
- Best Software to Merge Photos
- How to Merge Photos
- Download the Best Photo Merging Software for Free
- Merge Photos Together FAQ
What Is Photo Merging?
Photo merging is a photo editing process that visually combines multiple images into one. This process has various applications, and the proper method of photo merging depends on your photographic style and project requirements.
Layer editing is one of the most common forms of photo merging. Using layer editing, you can combine photos as overlaying elements. This editing technique lets you overlay a unique texture over a portrait or photo of a subject, such as a landscape or a city skyline. You can also expertly combine two images, even if they don’t have a similar composition or light style.
Blending modes are effects that blend the color pixels of base images and overlays in unique ways, creating impressive results. Using these tools, you can give a surrealist effect to everyday objects or change your subject’s profile to consist entirely of a specific texture.
The layering capabilities you get with PhotoDirector include layer gradient adjustments and multiple borders. You can also set an individual blending mode for each individual layer property. The ability to copy and save layer properties is a time saver and can boost your productivity.
PhotoDirector offers an extensive library of textures you can use as an image overlay to convey a specific mood or message. This program saves all your work with layers in PhotoDirector Layer File format (.PHI).
The term “photo merging” can also refer to panorama stitching, ideal for photographers who don’t have a wide-angle lens. With panorama creation, an AI feature compiles multiple images of the same landscape or subject, creating one vertical or horizontal merged image file.
Best Software to Merge Photos
PhotoDirector
PhotoDirector is the best photo editing software for merging multiple images. The photo editor is compatible with Windows and Mac, and it offers a complete range of professional image editing tools, enhancements, and effects.
Using PhotoDirector, you have full photo merging functionality, and you can combine images using layer editing with blending modes, panorama stitching, or create collages. This software is easy to use and learn, even if you are a beginner image editor.
How to Merge Photos
When merging photos in CyberLink PhotoDirector, you have access to an extensive range of tools. Following the steps below can help structure your workflow. Remember to experiment with different settings and effects until you find the best results for your project.
Download and install PhotoDirector to access professional tools for merging photos.
Initial Steps
- Download and install PhotoDirector on your computer.
After downloading PhotoDirector, visit your browser’s download section, and open the PhotoDirector download file to install.
- Launch PhotoDirector and import your image files.
After installing PhotoDirector, launch the software on your computer. Once PhotoDirector is open, click on the Library tab in the top left corner of your screen and click the Import button. You’ll find the Import button in the bottom left corner of your screen.
Select Photos from the Import drop-down menu, opening your local storage directory. Next, select all the images you want to include in your project, and click Open.
The Photo Import window will open. Click the Import button at the bottom right of this window.
Under the Smart Collection drop-down menu, the images you chose will be available under All Photos and Latest Imports.
Merge Photos with Layer Editing
After importing your images, you can start merging them.
- Open the Edit
In previous versions of PhotoDirector, the layer editing capability appeared under the Layers tab. Now, you will find layer editing under the Edit tab.
Click on the Edit tab, opening the layer editing platform with the layer controls on the left and the editing tools, such as Gradient, Fill, Text, and drawing brushes, on the right.
- Add the base image as the first layer.
The imported images will appear below your preview screen in the Edit tab. Locate the image you want to use as the base layer, and drag and drop it on the preview screen. The image thumbnail will appear in the left-hand window below the Opacity adjustment slider.
- Add the overlay image to your project.
After adding the base layer, or background image, you can now add the first overlay, following the same process as above. Select the image from the bottom image scrollbar and drag and drop it on the base image in your preview screen.
The overlay’s thumbnail will appear below the base image’s thumbnail in the left-hand window. Your overlay will appear over the background image in the preview screen.
Repeat this process for every overlay image you want to add to your project.
Drag the thumbnails in the left-hand window up or down to change the layering order.
- Work on each layer individually.
PhotoDirector lets you hide layers to work on each layer individually. To hide a layer, click on the eye icon to the left of the thumbnail. You can unhide the layer afterward.
- Remove a background or other elements from a layer.
Some layers may feature unwanted elements, such as a background or object. To remove these elements or isolate a subject, you need to use the Area Selection Tool. Open this tool by clicking the brush icon at the top of the right-hand vertical toolbar (Select Area Tool).
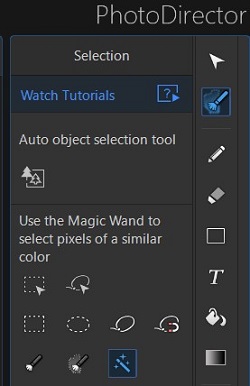
If you want to remove a significant element, such as a background with one color, click on the Magic Wand icon in the Selection menu. Click with the wand on the element you want to remove, highlight it, and click on the Delete Selection tool to remove the element. The image will become transparent when you remove an element, and the bottom layer will be visible in the area.
- Select elements using the Smart Brush.
You might want to select a single element from a layer to include in your project. However, if the subject doesn’t appear on a monotone background, you can’t use the Magic Wand tool.
Instead, select the Smart Brush and move it over the subject, selecting it. You can adjust the size of the Smart Brush and add a feather effect around its edges.
Using the Invert Selection tool, you can choose whether you want to select the subject or anything but the subject. Then, complete the process by clicking Delete Selection.
- Adjust the size and location of your elements.
Now that you have individual image elements in multiple layers, you can resize them. If you still have the area selection window open, click on the arrow above the tool to go back to the primary layer editing tool.
Unlock an image for resizing by clicking on the lock icon to the right of the image thumbnail. Next, adjust the image size by dragging the nodes in the preview screen. Consider unhiding all the layers so that you can make precise size adjustments.
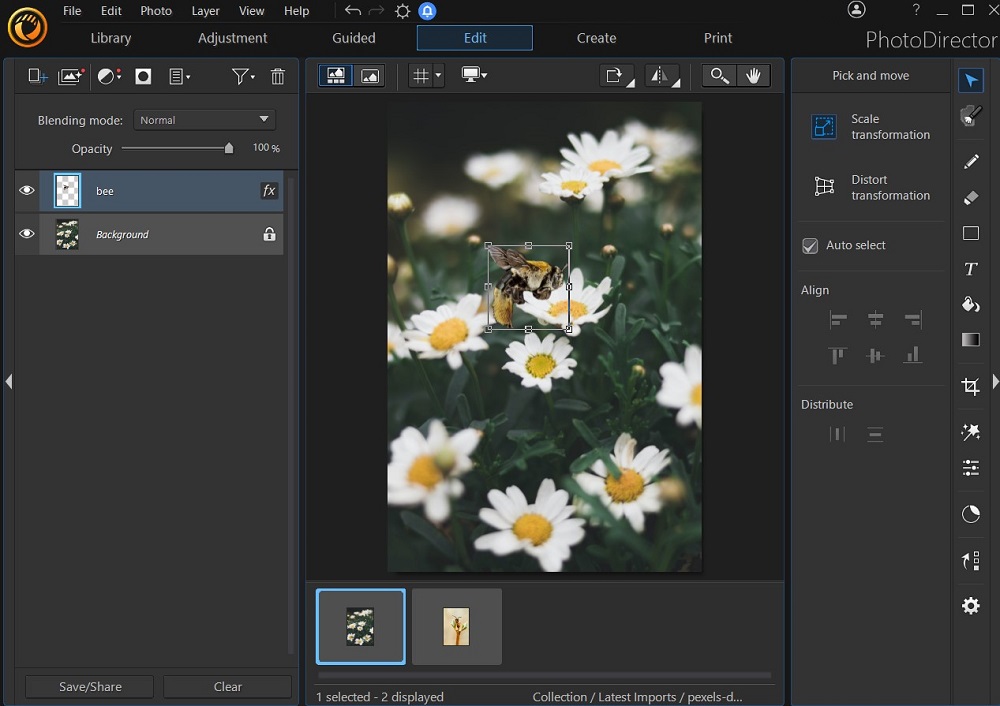
You can reposition the layer element using the Pick and Move tool. Use the Scale Transformation and Distort Transformation options for complete resizing customizability.
- Erase overlay edges and other elements.
After resizing an overlay, you might find that its edges don’t visually integrate well with the base image. Select the Eraser tool from the right-hand vertical toolbar, and use it to remove some of the overlay’s excess regions. You can adjust the eraser’s size and opacity.


How to Merge Photos with Blending Modes
PhotoDirector’s blending modes add a new dimension to layer editing. A blending mode creates a visual connection between layers, and PhotoDirector offers a wide range of modes that you can choose from and use for your project.
- Download and install PhotoDirector on your computer.
- Import the images you want to combine and edit them following the steps above.
- Adjust each overlay’s opacity.
- Apply a blending mode to the layers.
In the top left of your screen is the Blending mode drop-down menu. From this menu, you can choose from different blending modes.
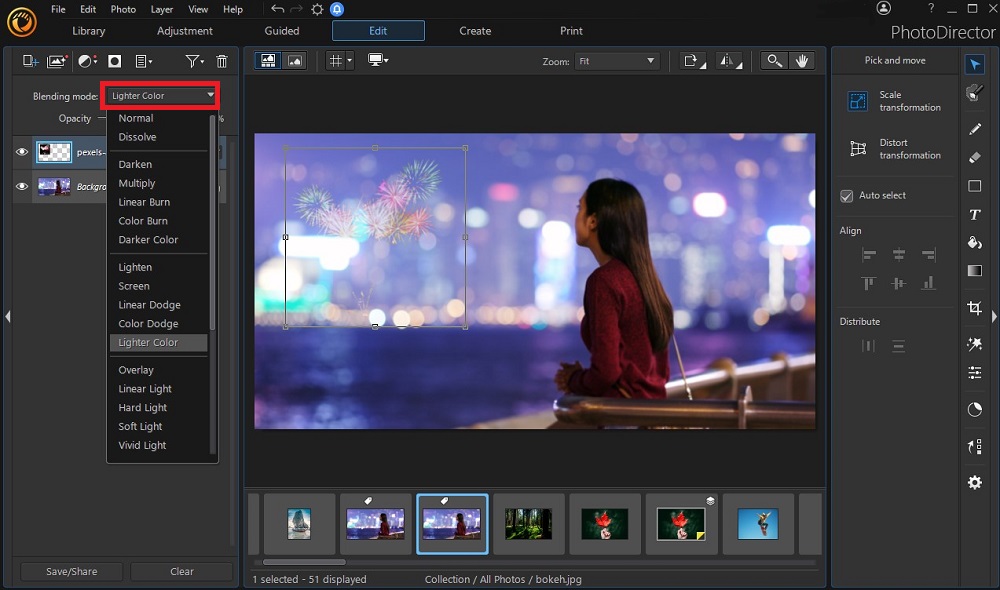
The standard blending modes include Normal and Dissolve. Blending modes with a darkening effect include Darken, Linear Burn, and Darker Burn. If you want the blending mode to have a lightening effect on your image, choose Linear, Screen, Linear Dodge, Color Dodge, or Lighter Color.
Some blending modes, such as Hard Light, Vivid Light, or Hard Mix, have a contrasting effect between the layers. Experiment with the various blending modes until you find one that fits your layers’ composition and light styles.
- Readjust the layers’ opacity.
After applying a blending mode, consider making readjustments to the overlay’s opacity using the adjustment slider below the Blending modes. Some blending modes can make an overlay transparent, so readjustments might be necessary to ensure that you get the correct result.
- Create the merged picture.
Are you happy with your layers and blending mode? Open the Layer Manager drop-down menu and select Merge All. PhotoDirector will compile the layers you added and edited into one image.
All the photo thumbnails to the left will disappear, and your new combined image will appear. You can continue editing and enhancing this image using the PhotoDirector tools.
- Save your project.
After merging your photos into one image, you can save it directly to your local storage. Click on File and select Export Project. Choose the location where you want to store the image. You can also hover your mouse cursor on Share Selected Photos On and share the image online.
Depending on your project requirements, you might want to make a layer transparent so that elements of the base layer are visible. Click on the relevant image thumbnail and adjust its opacity using the slider below the Blending mode drop-down menu.
After applying the blending mode, you might need to revisit this step.

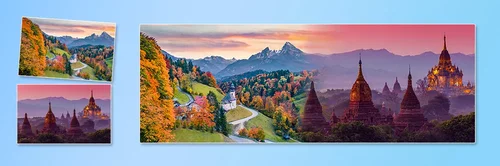
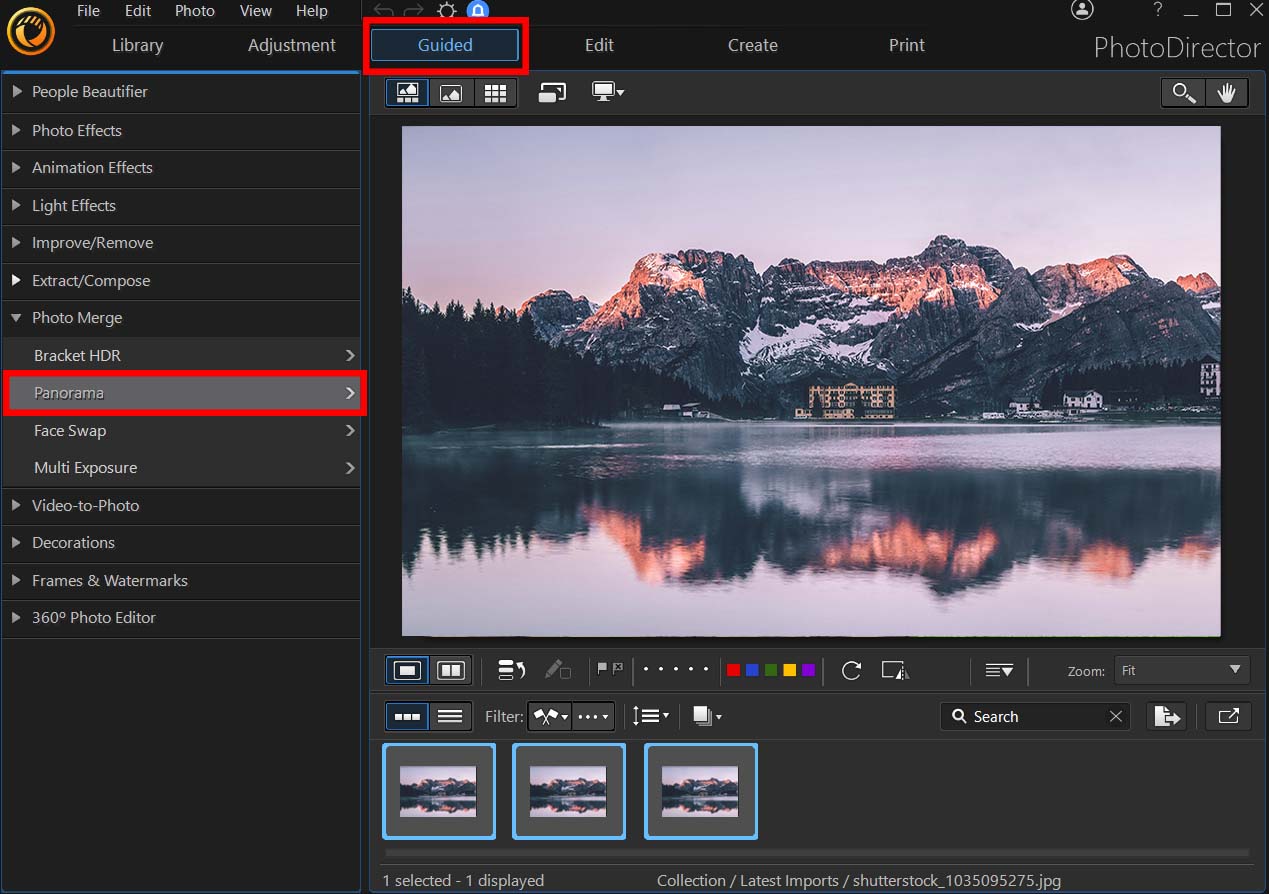
How to Merge Photos in a Panoramic Photo
Do you have multiple images of a landscape, city skyline, or another scene? Using PhotoDirector, you can merge these images into one panoramic image. The software’s AI tool stitches these images together, and you don’t need to match them up manually.
To create a panorama from multiple frames, follow the steps below:
- Import the images of the same scene to the PhotoDirector editing platform from your local storage.
After importing the images, they will appear in the Latest Imports folder and the bottom browser panel.
- Click on the Edit tab, and select Panorama from the Photo Merge drop-down menu.
- Add your images.
Highlight the images in the browser panel below the preview screen. Then, drag and drop these thumbnails into the preview screen using your mouse cursor.
If you highlighted all of these images, adding them to the shot requires a single motion. You can also double-click on them to add them to the workspace.
- Merge the images into a panorama image.
After adding the images to the preview screen, click the Merge button below the image thumbnails. PhotoDirector’s AI tool will intelligently compile the images into one panorama image.
- Crop the panorama image.
In most cases, the panorama images that PhotoDirector creates will need some cropping as the image files are generally not the same size. For example, your panorama image might have thin black edges where the image frames were too small. You can resolve this issue by cropping the image. The cropping nodes already appear around the image, and you don’t need to open a cropping tool.
- Use the Autofill Boundary tool.
If you don’t want to crop your panorama image, you can check the Autofill Boundary box to the left of the preview screen. After you check this box, PhotoDirector will analyze your image and use the information on the image to fill the black edges. This autofill feature has relatively high accuracy and works best if the areas around the edges have a monochromatic color scheme.

Download the Best Photo Merging Software for Free
PhotoDirector is one of the best photo editing and management programs available, and it is easy to use for editors of all experience levels. Whether you need photo editing software for creating layers, collages, or panoramas, PhotoDirector is your best option.
Beyond photo merging, PhotoDirector offers exceptional photo editing and enhancement features, including high-quality effects, intelligent corrections, and professional retouching tools to fix imperfections. You can use PhotoDirector to adjust mid-tones, shadows, and highlights and have complete control over basic properties, such as hue, saturation, and lighting. The program also offers animations and professional AI functions, such as sky replacement and fast masking.
Now that you are ready to merge pictures, download PhotoDirector today and start creating professional image content.
Merge Photos Together FAQ
The top five features you should look for are
- Compatibility with your operating system.
- Precise layer editing.
- Panorama stitching features.
- Extensive library of blending modes.
- Intelligent corrections.
The top three best photo merger apps are
- PhotoDirector app
- Adobe Photoshop Mix
- Pixlr


